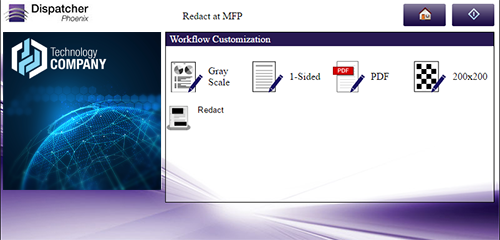
Tech Tip 36: Using the MFP Simulator to Simulate Multiple Users
The MFP Simulator is a great tool that comes with Dispatcher Phoenix. It can be accessed in three different ways: from a web browser, in the client, and in a standalone application. Its main use is to test and demonstrate Dispatcher Phoenix without needing to access an MFP.
An advanced configuration of the MFP Simulator allows users to show how the MFP will appear to multiple users at the same time. This has several uses, including:
Testing a workflow or system that will have multiple users accessing it simultaneously for configuration changes.
Demonstrating how the MFP panel will look to different users with different workflows shared to them.
Some tips for configuring your workflow to use the MFP Simulator to simulate multiple users:
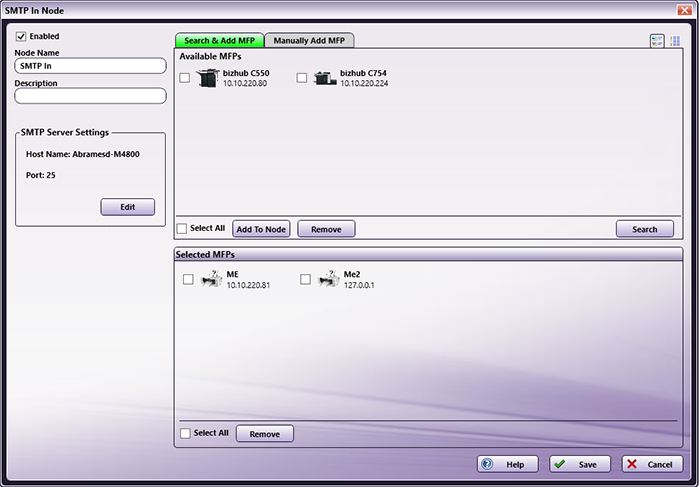
When creating the workflow, ensure the MFP Simulator is available in the “Selected MFPs” section at the bottom of the MFP Panel window. If it is listed in the “Available Registered MFPs” section, you can move it by selecting it and clicking the “Add to Node” button or by dragging and dropping it into the “Selected MFPs” area.
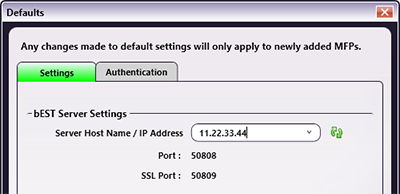
Ensure the default login method is appropriate for your workflow by clicking on the “Launch MFP Registration Tool” button, the “Defaults” button in the upper-right corner, and then the “Authentication” tab.
Once your workflow is running, do the following:
Run the MFP Simulator. This can be accessed from the Dispatcher Phoenix client or from the Windows menu.
Login with the first user's credentials.
Right click on the MFP Simulator icon in your Taskbar.
Press and hold the Shift key and right click on the “MFP Simulator” option in the menu.
Click the “Run as different user” option.
Enter the credentials for the second user.
There will now be two separate instances of the MFP Simulator open and running. Steps 3 through 6 can be repeated multiple times to simulate additional users. From there, it's easy to rotate through each instance of the MFP Simulator to test multiple users or to demonstrate how different users see different options based on workflow sharing and other settings.
Tip 35: Set Up Email Alerts in the MFP Dashboard to Catch Issues Early
Want to know the moment a device goes offline, runs out of paper, or drops to low toner? You can enable MFP Dashboard alerts right from your Profile page—no admin required.
How to Enable MFP Dashboard Email Alerts
Open Your Profile
In the top-right corner of the Stratus portal, select your profile menu and choose Profile.
Scroll to the “Messages” section
You'll see a list of notification categories with checkboxes for Email and Inbox delivery. (This section displays grouped message categories like Release2Me, Jobs, Workflows, Auth, MFP Dashboard, etc.)
Find the “MFP Dashboard” category
This section includes three alert types:
Empty Paper Tray
Low Toner Level
Device Offline
Enable Email Alerts
Check the box under the Email column for each alert you want to receive. Checking “Inbox” will also send notifications to your in-portal message center
Changes to your settings will be automatically applied. Alerts will be delivered whenever that condition occurs on any MFP you have access to.
Why This Is Useful
Instant awareness when a device goes offline or needs supplies
Fewer surprises for users who rely on specific MFPs
A proactive heads-up for admins or help desk teams without needing to monitor the dashboard constantly
Fast troubleshooting because you know what's wrong before the tickets roll in
The Dashboard shows you what's happening. Alerts tell you the moment it happens.
Tip 34: How Print Defaults Cascade in Dispatcher Stratus
To enable printing across an organization, Dispatcher Stratus and Dispatcher Release2Me Cloud enable print workflows via different types of Print Queues. A print queue is a managed pathway that controls how print jobs move from a user to a printer within Dispatcher Stratus. It acts as the “traffic controller” for printing—organizing, holding, and applying the correct preferences to each job before it reaches the device.
The print queue plays a critical role in ensuring printing behavior is consistent, secure, and aligned to the organization's needs. To facilitate consistent and secure printing, print permissions and preferences in Dispatcher Stratus work together in a cascading hierarchy. Understanding this flow can help admins optimize control while still giving users the flexibility they need at the device.
How the Cascade Works
Dispatcher Stratus uses a three-tier model for managing print preferences:
Tenant admins set the baseline for all print behavior across the entire organization.
These are the highest-level controls.
Settings here establish the default print preferences (e.g., color vs. black & white, 2-sided printing, finishing options).
Admins also decide which settings users are allowed to modify.
These preferences cascade downward to all print queues.
Think of tenant-level settings as the organization's best practices—they set the tone for everything beneath them.
Queue-Level Controls (Refined for Specific Print Queues)
When creating or managing a print queue (e.g., a shared office printer), admins can:
Adjust the defaults inherited from the tenant level.
Further adjust what users can change at the MFP Panel.
Customize preferences to align with the purpose of the queue (e.g., defaulting a marketing printer to color, but keeping one or more finance printers in black & white).
Queue-level settings can fine-tune the behavior for each workflow or location.
User-Level Interaction (At the MFP Panel)
When a user releases a print job at the device, they have the option to customize their personal print preferences:
They see the options enabled at the queue level.
They can modify their personal print preferences only within the allowances set by tenant and queue rules.
Anything disabled at higher levels will be unavailable at the MFP panel.
Users can personalize their print experience, but always within the guardrails of organizational policy.
Why this Matters: Smarter Permissions, Smoother Printing
The cascading permissions model in Dispatcher Stratus ensures consistency, control, and simplicity across your entire print environment. Tenant admins establish best practices, queues fine-tune them, and users get a clear, streamlined experience at the MFP panel. By understanding how each layer influences the next, you can create a printing ecosystem that's both efficient and adaptable.
Tip 33: Do More with Direct Print Queues and PJL
Dispatcher Stratus and Release2Me Cloud allow you to add PJL headers for customizing print jobs when configuring print queues, including direct print queues. To get started, here are a few things you should know about PJL:
Wait! What is PJL?
PJL (Printer Job Language) is a universal language that modern printers use to configure print jobs. This means that if you have the right PJL, you can get a printer to do just about anything.
Why Should I Use PJL?
Great question! Corporations and organizations have been moving away from print drivers, because they require constant maintenance. That means that a lot of the functionality of printers has become harder to use, because the features were controlled by the print drivers. PJL allows us to regain access to those printer features without needing drivers.
So...What Can I Do With PJL?
PJL is great for telling printers what to do. For example, you can use PJL to tell a printer to always use a certain paper tray. You can also use PJL to specify font replacement. This allows the device to dictate the font substitution if the font is not embedded. This is especially useful for production or commercial print use cases.
But basically, anything you could do with a print driver, you can do with PJL.
Can I Use PJL with Cloud Printing?
Absolutely! With Dispatcher Stratus and Release2Me Cloud, you can configure default PJL for your devices at the tenant level and more specific PJL the queue level, giving you complete control over how documents are printed.
For automated workflows and direct printing, PJL can take the guesswork out of how documents will print. Take the following workflow as an example:
A warehouse prints pick lists for their employees. Each pick list is scanned using OCR and then printed based on information taken from the document. Most lists are printed on normal paper, but high priority lists are printed on yellow paper (found in tray 2), and tax exempt orders are printed on pink paper (tray 3). Each of the direct print queues in the workflow are configured with the proper PJL to ensure the documents going to that print queue (normal, high priority, tax exempt) are being printed from the correct paper tray.
This is just one example of how PJL can be used to optimize automated printing. The sky is the limit! One important thing to remember is that devices don't always use PJL in the same way. For example, one device might have trays listed differently from another device. To ensure that you are using the correct PJL for your devices, contact your Konica Minolta representative.
Tip 32: How to Address Complex Customer Needs with Dispatcher Solutions
There are times when what the customer needs may seem beyond the scope of what Dispatcher Phoenix and Dispatcher Stratus can accomplish. However, with a few simple steps, customer needs can be simplified and met. In this tech tip, we will examine a real life use case and the steps our team took to address the potential customer's needs – and how you can do the same!
Step 1: Talk to the Customer
The discovery call is vital. This is when the sales team and the customer get to know each other and really hash out exactly what the customer needs. The discovery call allows the customer to express their current processes and goals in a way that can be probed and clarified in the most productive ways.
Take, for example, a recent customer: a large funeral home's internal processes can produce a large number of paper forms for each customer. Since each customer has unique needs, this means that a packet of anywhere from one to fifty forms (some of which are multiple pages) needs to be digitized and archived. This process has been done manually until now, which requires a huge amount of time and takes employees away from their ability to provide comfort and service to their customers.
Step 2: Break It Down
One of Dispatcher Phoenix's greatest strengths is its customizability – there are so many nodes with individual functions that can be combined in different ways. Because of this, it's a good idea to break down the customer's needs into discrete problems that can be solved. Start at a high level and continue breaking the problem down into smaller and smaller problems until a single node can accomplish a single task. Then, string together the nodes into a workflow.
Since the customer in question already has paper forms, the main problem to be solved is dealing with a packet of forms that will not always be in the same order and will not always contain the same forms. In this case, splitting every packet by page allows Dispatcher Phoenix the best opportunity to analyze the content. By breaking the workflow into several distinct areas based on function, a high level view of the workflow would look something like this:
Scanning – The customer's packet of forms is scanned at the MFP.
Pre-Processing – The packet is split by individual page.
Reading – Every page is individually scanned for specific, unique identifiers. These identifiers allow Dispatcher Phoenix to identify and group forms with multiple pages into coherent combinations.
Merging – Any collection of single pages that belong as a single document with multiple pages is re-combined into a single document.
Routing – These documents are all routed to the customer's personal folder on the funeral home's network.
Step 3: Iterate
Just like any great work of art, a workflow doesn't appear out of thin air. Build a simple version of the workflow – a proof of concept – that accomplishes the task for the customer. Then, build it out further. Test with different sample documents. This step can be done with help from the customer as well, both to demonstrate the capability of the solution and to find out more about edge cases the customer finds.
For example, we built backups into the workflow that allow employees to manually process documents in the rare event that a form cannot be automatically processed. These fail-safes ensure that even documents that are difficult to read can be reassembled and routed properly.
Conclusion
The customer was able to gain the following benefits from their new, automated workflow:
Dramatically reduced the amount of time it takes to process customer form packets.
Improved customer experience due to faster processing and increased employee availability.
Reduced time to payment.
The framework presented here can be applied to almost any customer problem and is a great way to address the concerns of the customer quickly and efficiently.
Tip 31: Three Ways to Streamline Release2Me Workflow Creation
Release2Me Cloud is a powerful new feature that integrates with Dispatcher Stratus to provide users with automated document processing and secure print release at the MFP. We've compiled a few tips and tricks for getting the most out of your Release2Me experience.
Queues Before Workflows
To make your Release2Me and Dispatcher Stratus experience as efficient and streamlined as possible, we recommend that you finish all of your queue configuration before you begin configuring a workflow that uses the Release2Me In and/or the Release2Me Out nodes. When configuring each of those nodes, you will need to select one of the existing Release2Me queues – but don't worry! If you haven't made any yet, there's a handy link provided in each node that will take you to the page where you can configure your queues!
To make configuring print queues even easier, Release2Me now comes with an automated installer. This simple download will install print queues on your computer with just a few clicks, making setup even easier.
Differences in Queue Types
Speaking of queues, there are several queue types, each of which has a different intended use. Selecting the correct queue type during configuration is vital for their usefulness later.
My Print Queue – Your personal queue. No other user has access to these documents, unless you delegate them to other users through the portal. Designed for documents that only you will print.
Shared Print Queue – A queue that is shared by users and/or user groups. Great for collaboration, group access, etc.
Direct Print Queue (Coming Soon) - Designed to send documents to an MFP for immediate printing. Excellent for those last-minute printing needs and workflows that require an immediate physical result.
Release2Me In – Used as an input for automated workflows.
Configuring a Release2Me Workflow
What's the difference between the Release2Me In node and the Release2Me Out node? Both queue types can be added to your computer like any other printer and “printed” to. When a document is "printed” to a Release2Me Out queue, the expectation is that a user will then print the documents at an MFP, like in this example of a customer check-in to point-of-sale workflow. The customer checks in and selects the department where they would like help. The customer's information is routed to that department; then, at the end of the interaction, a document is printed for the customer with a summary of the sale and interaction.
When a document is “printed” to a Release2Me In queue, that marks the beginning of an automated or People-Based workflow. Interestingly, workflows that begin with a Release2Me In node often end with a Release2Me Out node (though it's not required). So, the Release2Me In node is just a way to get a document into a workflow the same way you would print a document. In this example, a user “prints” to the workflow, where the document is OCR'd for certain keywords and then routed to receive the proper annotation before being sent to the print queue for easy, secure print release.
We hope these tips and tricks help make Release2Me and Dispatcher Stratus the easiest secure print and workflow automation solutions you've ever used. If you have any questions about how your organization can use these products, contact your local Konica Minolta representative.
Tip 30: Configuring the bizhub SECURE Notifier Dashboard
Ensure your MFP fleet is compliant with various security protocols - Setting up your tenant for bizhub SECURE Notifier device monitoring is quick and easy.
Securing your MFP fleet is an important step in your layered security plan. The good news is that taking that step is now easier than ever before. With the bizhub SECURE Notifier (bSN) app and Dispatcher Stratus, your MFP fleet can be monitored from a single location: the bSN Dashboard. Getting the bSN Dashboard set up to monitor your fleet is a breeze.
Device Setup
Before you can start setting up your bSN Dashboard, you will need get your devices configured:
Install the bizhub SECURE Notifier app and the Dispatcher Stratus app onto your device.
License and register the device through Dispatcher Stratus.
Enable the “Dispatcher Stratus and ScanTrip Cloud Integration” option in the bSN app settings. For large MFP fleets, the Copy App Settings option can be used to streamline this configuration for all devices once one is enabled.
Your device will now be available for remote security compliance monitoring.
Monitor Devices
The next step is to select and group the devices you would like to monitor:
On the bSN Dashboard page, select the gear icon in the upper-right corner.
Select the devices you would like to monitor with bSN from the available devices. If a device is not available, ensure that it is registered with the tenant and has the bSN app installed.
Select the Save button.
Once a device has been added to the bSN Dashboard, it will appear in the Devices (Individual Policies) area and the Device Overview, along with a status indicating Secure, Not Secure, or Unknown (if the device cannot be accessed). Devices will also have the default security policy applied.
Configure Policies
The security settings that apply to each device can be configured for individual devices or for groups of devices. Do the following:
To configure a security policy for an individual device, select the Settings icon located on the right side of the device entry in the table. To configure a security policy for a group of devices, select the “Create Policy Group” button in the upper-right corner of the bSN Dashboard.
Use the provided options to configure the policy settings. Note: If you are configuring a group policy, you will need to enter a Name for the policy.
Select the Save button.
For individual devices, the policy will be applied to the device. Each Group Policy will have its own table and be visible below the Individual Groups table.
Add Devices to a Group
Once a device has been added to the bSN Dashboard and you have created a group policy, you can add devices to the policy group for easy management:
Select one or more devices by using the checkbox on the left side of the device's entry in the table.
Select the “Move to Policy Group” option on the right.
Use the drop-down to select a preconfigured security policy.
Select the Move button.
Devices will now be grouped and have the group policy applied to them.
To learn more about the bizhub SECURE Notifier integration with Dispatcher Stratus and Dispatcher ScanTrip Cloud, please contact your Konica Minolta representative today!
Tip 29: Dispatcher Stratus Release2Me Cloud - Adding a Print Queue in Various Environments
Digital Print Queues can be added to a computer and “printed” to just like any other printer. But adding the print queue to the computer can be a little tricky, depending on the computer. Here, we'll walk through the setup in three common OS environments: Windows 11 24h2, Windows 10 and older versions of Windows 11, and macOS Monterey (version 12) and newer.
Adding Release2Me as a Printer – Windows 11 24h2 and later
The URI provided for each queue can be added like any other printer. To add Release2Me as a printer, do the following:
In the Windows search bar, search for “Windows Features”. Ensure that the Print and Document Services option is checked. Select the + to expand the selection. Ensure the “Internet Printing Client” option is selected.
Important! Release2Me will not function if these options are not selected.
In your tenant, copy the URI for the queue you would like to add from the My Qs page.
On your computer, open the “Printers & Scanners” configuration, either by searching for it or navigating to Settings > Devices > Printers & Scanners.
Select “Add a printer or scanner”. Your computer will search for available devices. After a few seconds, you will see a link for “The printer that I want isn't listed”. Select it. The Add Printer window will appear.
Select the “Add a printer using an IP address or hostname” option. Click Next.
Ensure that “IPP Device” is selected in the Device Type drop-down. Then, paste the copied URI into the Hostname or IP Address field. Select the Next button.
You will see a confirmation message that the queue has been successfully added. Select the Finish button.
Your queue will now be available as an option when printing.
Adding Release2Me as a Printer - Older Versions of Windows 11 and Windows 10
Older versions of Windows include:
Any version of Windows Server 2022.
Any version of Windows 10.
Versions of Windows 11 older than 24h2.
To add Release2Me as a printer in these environments, do the following:
In the Windows search bar, search for “Windows Features”. Ensure that the “Print and Document Services” option is checked. Select the + to expand the selection and ensure the “Internet Printing Client” option is selected.
Important! Release2Me will not function if these options are not selected.
In your tenant, copy the URI for the queue you would like to add from the My Qs page.
On your computer, open the “Printers & Scanners” configuration, either by searching for it or navigating to Settings > Devices > Printers & Scanners.
Select “Add a printer or scanner”. Your computer will search for available devices. After a few seconds, you will see a link for “The printer that I want isn't listed”. Select it. The Add Printer window will appear.
Select the “Select a shared printer by name” option.
Paste the copied URI into the Hostname or IP Address field. Select the Next button.
Select the “Generic / Text Only” option in the Add Printer Wizard. Select the OK button.
Go to the Printer Properties for the print queue you just added. In the Advanced tab, select “Microsoft IPP Class Driver” from the Driver drop-down. If you do not complete this step or if you do not have access to this driver, your documents will print as text-only. Select the OK button.
In the Ports tab, select the name of the printer you added. Then, select the “Configure Port” button.
Select the “Use the specified user account” option and enter your Dispatcher Stratus/Dispatcher ScanTrip Cloud User Name and Password. Click the OK button.
Important! When using Release2Me on a printer configured with this method, it will automatically use the entered login information and will not ask for credentials during printing.
Adding Release2Me as a Printer – macOS 12 (Monterey) and newer
To add a Release2Me print queue to a Mac environment, do the following:
In your tenant, copy the print queue URI from the header of the print queue. You will use this in Step 7 of this section or in Step 5 of the Add Queue Manually section below.
In the upper-left corner of the Mac home screen, select the Apple logo. A drop-down menu will appear.
Select the “System Settings…” option.
In the panel on the left, select “Printers & Scanners”. This will open the Printers & Scanners settings.
In the panel on the left, select “Printers & Scanners”. This will open the Printers & Scanners settings.
If “IPP” is an option in the Use drop-down at the bottom, select that and continue with step 7. If “IPP” is not an option, skip to the Add Print Queue Manually section below.
Enter the following information:
Address - Paste the copied URI into this field. Then, remove the https:// from the beginning, remove everything after .com, and add :433 at the end. The URL should look similar to this: us-east-1.ipp.dispatcherstratus.com:43
Protocol - Select the “Internet Print Protocol – IPP" option if it is not already selected.
Queue - Copy and paste the information from the desired queue here, starting with ipp. The field should look similar to this: ipp/print/kmbssec/my-print-queue/55738b3b.
Name - Enter a friendly name for the queue, such as “Personal Print Queue” or “HR Department Print Queue”.
Location - You do not need to add anything to this field.
Use - Select the “IPP” option if it is available. If it is not available, skip to the “Add Print Queue Manually” section below.
Select the “Add” button. A screen will appear to indicate the progress as the system adds the printer.
Select the OK button after setup is complete. Your print queue should appear in the list of printers and you can now select the print queue like any other printer. You may need to select the “Refresh” button to enter your login credentials when adding a document to a print queue in this manner.
Add Mac Print Queue Manually
Close the Add Printer window.
Open the Mac Terminal. This can be accomplished by either:
Selecting the Launchpad icon, typing “Terminal” in the provided search field, and selecting Terminal when it appears.
Selecting the Finder, accessing the /Applications/Utilities folder, and selecting the Terminal.
Enter the following script: lpadmin -p {PRINT_QUEUE_NAME} -E -v {PRINTER_URL} -m everywhere
Replace {PRINT_QUEUE_NAME} with the name of the print queue. If there are any spaces in the print queue name, replace the space with an underscore (_).
Replace {PRINTER_URL} with the print queue URL.
Press the Enter key.
The Results
After completing the steps for your computer's operating system, your Release2Me print queue will appear in your list of available printers. Select it, and press “Print” to send your document to the print queue, which can be accessed securely at the MFP, where you can release it to be printed. This ensures you're there to pick up your documents – no more stolen, lost, or accidentally-recycled documents!
Tip 28: Dispatcher Stratus - Protecting Your MFPs with Authentication
Controlling access to your multifunction printers (MFPs) is more important today than ever, due to the numerous apps and web applications that have access to device data. Let Dispatcher Stratus and Dispatcher ScanTrip Cloud help protect those MFPs by employing authentication. When protected with authentication, nobody can access your MFPs without a user account.
Authentication is available for both Dispatcher Stratus and Dispatcher ScanTrip Cloud, but this article focuses on Dispatcher Stratus for simplicity.
Dispatcher Stratus handles the majority of the configuration and installation for you, making it a much simpler process than you would expect. Let's take a look at how.
Prerequisites
Enable SSL on the MFP (see device documentation for your specific model)
Make sure the MFP is powered on, awake, and connected to the internet
Install Konica Minolta MarketPlace and the Dispatcher Stratus app
Turn on Authentication in your Dispatcher Stratus tenant settings
Register the MFP with your Dispatcher Stratus tenant
Devices Page
On your Dispatcher Stratus tenant, go to the Devices page. There you will see all your devices that have been added to your tenant. Additionally, you can see if those devices are registered.
Note: If you do not see the MFP you are expecting or if it is not registered, please see Dispatcher Stratus documentation to walk you through adding and registering MFPs.
To begin the process of installing authentication on your MFP, find your device in the table and click on the “Enable Authentication” icon on the right. This will bring up a modal where you will need to enter the admin password for the MFP and where you can select features for authentication behavior on the MFP:
Enable the MFP's public user access
Enable “Quick Copy” access to provide an easy means of accessing the MFP to make copies
Automatically launch the Dispatcher Stratus app upon unlock
Allow users to use an ID card to login. You will want to make sure you have a card reader connected to the MFP.
Click the “Confirm” button and Dispatcher Stratus will install authentication on this MFP and, when complete, the Authentication icon will be highlighted in purple.
MFP
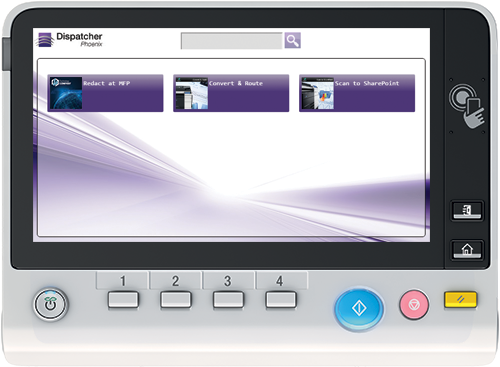
Now, when you walk up to your MFP, you will see a screen similar to the one shown below.
This screen may vary depending on the configuration selections you made during installation. Users with Dispatcher Stratus accounts may now use their username and password, or ID card to unlock the MFP.
To learn more about authentication and other new Dispatcher Stratus features, please contact your Konica Minolta representative today!
Tip 27: Dispatcher Stratus - Easy Integration of Metadata into Job Naming Conventions
We first introduced Job Naming Templates in our April
newsletter, where you learned about its many features and advantages. One of the
most powerful features is the ability to use information from submitted forms to create
those job names. Let's dive into how to do this by looking at the design approval use case
presented last
month.
The Input Form
The design approval workflow starts with a form for designers to submit work for approval.
Included in this form are the Product and Project to which the designs relate. These pieces
of information are key identifiers for the people reviewing and approving the designs.
Creating the Template
We have the form with the fields filled out so we can use the metadata from them. Now we need to create the Job Naming Template to place the data.
Opening Job Naming Templates in Dispatcher Stratus, we create a new template and add components to build out the job name desired. These can include text, dates, counters, and separators. Most important to this discussion, we will add two metadata components for placing our Product and Project data. The image below shows those two metadata components added to the template.
While the placeholders for our data are now present, the template needs to know what form (or other workflow-related element) the information will come from. So, save this template and let's go to the workflow builder to complete our job naming.
Applying Metadata in the Workflow
Once in the workflow, we can open the Internal Form Node and select our Design Approval Form. We assign the Job Naming template that we just created, and with that, we see the two empty metadata values that we need to assign.
On the left panel of the Internal Form Node, we set the value of the metadata from the two fields in the Design Approval Form - one for the Product and the other for the Project.
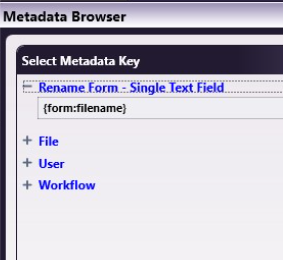
Click on the first “Click to set value” link to open the metadata browser.
Here you will see the name of the form selected for use in the Internal Form Node (“Design Review & Approval Form”). Opening that will reveal all of the form fields. Select {form:productdropdown} from the list. This is the product name selected from the dropdown on the right side of the form.
Repeat this process for the second metadata placeholder, using {form:project} for the project name. Once finished, the template will reflect the data that you have added.
The Result
With the workflow running and the form published, when a designer submits a job for approval, all reviewers and approvers will see the title of the job spelling out exactly what they are looking at — big impact made by the simple addition of metadata into the job name.
Tip 26: Let Users Choose the Next Step in Dispatcher Stratus Workflows
In Dispatcher Stratus, a node is an individual building block that performs
a specific task in a workflow—such as capturing a document, sending an email, or interacting
with a user. People Nodes are a special type of node that bring human
decision-making into automated workflows. They allow users—like administrators, reviewers,
or managers—to take action, approve steps, or choose what happens next. By enabling
User Selectable Transitions within People Nodes, you can empower users to
guide jobs through different paths based on the situation, making your workflows more
adaptive and efficient—especially in environments like legal, healthcare, education, and
enterprise, where human judgment is critical.
To empower users to participate in workflows, keep these key configuration options in the
People User node in mind:
Allow user to see next step in workflow – Lets users preview their transition
options before completing a task.
Send email notification for each status change – Notifies previous owners when the
job is accepted, reassigned, or completed (note: the current user doesn't receive
notifications).
If No Activity – Sets a reminder to notify the job owner about a job requiring
attention after it has been inactive for a preset amount of time.
Combine this with custom transitions in the People Queue node to create options like:
Escalate to Supervisor
Send for Legal Review
Route to Human Resources
Request More Information
Example in Education: A registrar receives a student application, selects “Send for Faculty
Review,” and the assigned faculty member then chooses whether to accept or escalate the
case. Everyone involved stays informed automatically.
Example in Legal: A legal team was bogged down by manual sorting of consultation requests.
With Dispatcher Stratus, they deployed a custom web form that routed new requests to a
centralized admin queue. The admin team used User Selectable Transitions to assign each
request to the appropriate Civil, Criminal, or Bankruptcy queue.
From there, the case was routed to a shared Paralegal and Attorney Review queue for final
evaluation. This flexible, human-in-the-loop workflow eliminated delays and significantly
improved client onboarding efficiency.
User Selectable Transitions help maintain momentum while giving teams the flexibility to act
confidently and appropriately at each stage of the workflow.
Ready to build smarter human-in-the-loop workflows? Explore transition paths that match your
team's real-world decisions. Explore our Sample Workflows for more information on User Selectable Transitions
and more.
Tip 25: Dispatcher Phoenix - Configuring for Secure MFP Authentication and Print Release
with ID Cards
Organizations that handle sensitive documents—such as those in healthcare, legal, enterprise,
education, and finance—need a secure, efficient way to authenticate users and control print
release at Multifunction Printers (MFPs).
Integrating ID card authentication with Dispatcher Phoenix not only enables seamless login
but also enhances secure print release with Release2Me, ensuring documents are retrieved
only by the correct user.
With the Card Registration Tool, organizations can map employee ID cards (e.g., HID
Proximity, iCLASS, MIFARE) to Active Directory or LDAP, enabling:
One-tap authentication at the MFP
Single sign-on (SSO) to Dispatcher Phoenix workflows
Secure print release with Release2Me, preventing unauthorized access to printed
documents
Use Cases: Who Benefits from Secure Authentication & Print Release?
Healthcare – Protect patient confidentiality by ensuring that
printed medical records, prescriptions, and patient forms are released only to
authorized personnel.
Legal – Prevent unauthorized access to case files, contracts, and
legal documents by requiring lawyers and staff to authenticate before print release.
Enterprise – Improve security and efficiency across departments
by automating authentication and print release, reducing unclaimed print jobs.
Education – Ensure faculty, staff, and students only access their
own printed materials, preventing mix-ups and reducing paper waste.
Finance – Secure sensitive financial reports, customer data, and
compliance-related documents by implementing controlled print release.
Getting Started with Card-Based Authentication & Secure Print Release
Prerequisites
A card reader with Keyboard Wedge interface connected to your PC.
An LDAP administrator account with permissions to update user entries.
Consistent LDAP settings across the Card Registration Tool, LDAP server, and MFP.
Release2Me enabled within Dispatcher Phoenix.
Step 1: Configure the Card Reader
Ensure the card reader outputs HEX values required for authentication at the MFP. The
configuration should align with the card reader settings at the MFP. Example: Configuring a Konica Minolta AU-205H
Enable Keyboard Wedge to allow the reader to function as a keyboard input device.
Select Card Data Type and configure the read parameters.
Format Output Data if needed to match authentication requirements.
Step 2: Set Up the MFP for Active Directory Authentication
To authenticate users via Active Directory/LDAP, configure the MFP as follows:
Time Settings – Ensure correct time zone and daylight saving adjustments.
DNS Configuration – Enter the Active Directory domain server's IP address.
External Server Registration – Register Active Directory as an external
authentication server.
Card Reader Authentication – Set the MFP to validate users based on card IDs
stored in LDAP.
Step 3: Configure LDAP Settings in the Card Registration Tool
In Dispatcher Phoenix Web, navigate to the Card Registration Tool and set up LDAP
authentication:
Card Registration Tool
Enter LDAP connection details (host, port, authentication type).
LDAP Connection
Define user attributes to ensure card data syncs with the MFP authentication settings.
LDAP Search
Step 4: Enable Release2Me for Secure Print Release
Within Dispatcher Phoenix, configure Release2Me to hold print jobs until users authenticate
at the MFP.
Enable Release2Me in Dispatcher Phoenix Workflow Designer.
Set authentication to LDAP to match card registration settings.
Ensure users must authenticate via ID card before releasing print jobs.
Step 5: Register ID Cards
Search for the user in LDAP.
Select the user from search results.
Scan the ID card using the configured reader.
Associate the card ID with the user in LDAP.
Step 6: Verify Card Registration & Print Release
To confirm successful registration:
Use the Card Lookup feature in the Card Registration Tool.
Scan the card – If registered, the user's details will be displayed.
Send a print job to Release2Me, authenticate at the MFP, and release the document.
Conclusion: A Secure and Efficient Authentication & Print Release Solution
By integrating ID card authentication with Dispatcher Phoenix and Release2Me, organizations
can:
Enhance security by ensuring only the right users access the MFP and print jobs.
Prevent unclaimed prints from being exposed to unauthorized individuals.
Improve workflow efficiency with seamless card-based authentication.
Meet compliance standards with detailed tracking and audit logs.
For more details, refer to the Dispatcher Phoenix Card Registration & Release2Me
documentation.
Would you like a personalized demo on how Dispatcher Phoenix + Release2Me can secure your
print environment? Contact us today!
Tip 24: CSS in Dispatcher Stratus Forms
The Dispatcher Stratus Form Builder allows you to create web forms for numerous uses in a
large variety of styles. When those forms are for corporate use, they most likely need to
adhere to strict style guidelines. While the Form Builder has property panels for setting
the style of each individual element, wouldn't it be great if you could make the items on
the form follow those corporate guidelines automatically?
This is where Cascading Style Sheets (CSS) come in. Let's take a look at a request form being
created for Kraken Technologies.
It looks fine at first glance. But if we consult Kraken's style guide, we find that the
following items are required for official forms:
Section Headings
Font: serif
Weight: bold
Color: #2E85A7
Text fields
Background: white
In practive, this list would be much longer, but we will focus on just these items now.
Classes
In cases where we want to affect only specific elements, we can employ classes. We do not
want to change the style of all the text on the form, we only want to change the style of
the headings. To accomplish this, we give the headings a class of "heading".
CSS
The following code entered into the “Custom CSS” field in the lower left of the form builder
will set all of the required styles quickly and easily. Each line has been given a comment
to explain exactly what is being affected.
Notice the “!important” text added to the end of each line. This is often essential to
override default styling of Dispatcher Stratus forms.
Result
Now let's look at the final result. Several elements on the form were able to be set easily
with just a few lines of CSS.
For an in-depth listing of all custom CSS settings that you can use in your Dispatcher
Stratus forms, please see the Dispatcher Stratus online help.
Tip 23: Tell Us What You'd like to Hear About!
Here at Konica Minolta's Solutions Engineering Center, we love creating content around our
internally developed and managed solutions. Using Dispatcher Stratus, we've created a form
that will allow you to submit your ideas directly to our team so that we can tailor the next
newsletter, and future publications, directly to you! How did we do this?
Step One: Configuring a New Form
Using Dispatcher Stratus' advanced form capabilities, you can create custom forms that can be
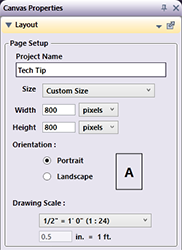
embedded in any workflow. Form settings are determined upon workflow creation, including the
size of the form, which can be customized to fit to your specifications, as shown below:
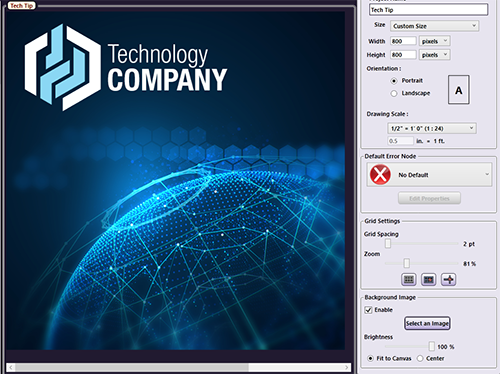
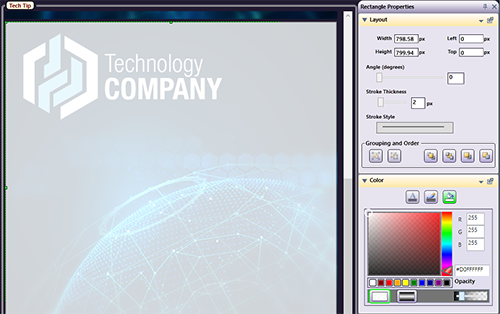
Step Two: Customize Your Form
Once you've selected your form settings, you can use the intuitive Form Builder to create a
form unique to your use case. Simply drag and drop your fields on the canvas and customize
the field properties as needed.
Step Three: Save and Publish Your Form
After saving your form in the Form Builder, ensure that your form is published. Only
published forms can be added in a Form Selector, Internal Form, or External Form in a
workflow.
Step Four: Configure Your Workflow!
Integrate your newly created form into your workflow! The workflow shown below accepts your
newsletter ideas from a form that does not require authentication. Using the External Form
node's iframe capabilities, forms can be embedded in third-party websites. Once a form
submission has been received, it is routed to a queue of users for review and approval, and
then sent for long-term archival.
Step Five: See it in Action!
Your feedback is incredibly valuable, and we'd love to hear what topics you'd be most
interested in learning more about.
Complete the following form to submit your ideas to SEC. This will submit your
content requests directly to our team.
In Conclusion
This type of workflow empowers us to centralize content creation requests and ensures that
ideas don't get lost in the shuffle.
We look forward to hearing your thoughts and collaborating with you to help create content
that is relevant and exciting. We are also ready to assist your organization in building and
managing similar workflows to meet your needs. For more information about Konica Minolta's
Solutions Engineering Center, visit our
website.
Tip 22: Demonstrating the Full Range of Features in Dispatcher
Phoenix
Dispatcher Phoenix is a powerful product
with many options to demonstrate to customers.
To
better support your sales efforts, NFR Licenses
for
Dispatcher Phoenix version 9.10 or above now
include
a Product Selector! Switching between the
different
versions of Dispatcher Phoenix allows you to
tailor
your product demonstrations and now only takes
seconds.
The versions of Dispatcher Phoenix available in
the
Product Selector include:
Traditional NFR
ScanTrip
Release2Me+
Base
Office
Legal
Finance
Government
Healthcare
Education
ECM/Enterprise
For a complete breakdown of the differences
between
these versions, click here.
Switching between the different versions is as
easy
as selecting your desired version from the new
drop-down menu in the upper-left corner of the
client. Selecting a version will automatically
restart the Dispatcher Phoenix client. When the
application reopens, Dispatcher Phoenix will
display
all the nodes and sample workflows associated
with
the selected version. In addition, any workflows
you've created will continue to appear. Because
the
selected version may have different available
nodes,
any workflows you created with nodes that are
not
available in your current version will have red
puzzle pieces to indicate the differences. These
workflows will not function as intended but
serve to
highlight the differences between the versions.
Quickly and easily tailor your product
presentations and demonstrations with the
Dispatcher
Phoenix Product Selector!
Tip 21: Dispatcher
Stratus - Drive Engagement and Lead Generation
with
eForms
Using forms within Dispatcher Stratus
enables you to capture, validate, and route
information efficiently within workflows.
Whether
you're collecting customer details, internal
requests, or approvals, forms provide a
structured
way to gather data, integrate it into your
workflow,
and ensure timely processing.
With the extensive set of design tools built into
the
Dispatcher Stratus Form Builder, you can craft
anything from simple feedback forms to branded,
multi-level surveys. By using sample forms and
workflows built into Dispatcher Stratus, you can
kick-start your automation of key processes. For
example, you can create a contact form and
response
workflow that allows you to capture leads and
nurture contacts.
How to Customize a Contact Form
On the Form Management page, in the Stratus
Sample Forms table, open the Lead Generation
form.
Configure the form: customizing the fields,
adjusting the labels, etc.
Publish the form.
Build a workflow and add the form to it!
Workflow Configuration Example
Start with an External Form node. Customize
the
configuration to include or exclude
authentication
Use the Flatten Form node to collect
customer
feedback into a digital document that can be
enriched with metadata.
Enable intelligent routing based on the
choices
the user makes on the form.
Empower user groups to act on incoming forms
like scheduling a discovery call or email
response with People Queue nodes.
Customize the workflow output:
Want to delete all form and workflow
data after processing? Add an End
node.
Do you need to save all form data
and
workflow activity? Enable Metadata
to
File and customize your distribution
point.
Benefits
Efficient Data Collection:
Automatically
capture and validate key information,
reducing
manual entry errors.
Seamless Integration: Combine with
other
workflow nodes for smooth document routing
and
processing.
Automated Responses: Set up triggers
for
emails or notifications based on form
submissions.
Dispatcher Stratus simplifies your
document management and ensures the correct
data
is collected and routed seamlessly within
your
workflows. To discover how you can make the
most
of your lead generation efforts today,
customize
the sample Lead Generation workflow and form
from your Dispatcher Stratus tenant.
Tip 20: Dispatcher
Stratus - Intelligently Routing Incoming Faxes
for
Manual Review
It's no secret that businesses in the
digital age need to find new ways to manage
their
business processes. A large enterprise was
looking
for a way to achieve digital transformation and
as
part of this initiative, the customer needed an
efficient and flexible solution to automate the
overwhelming, cumbersome and time consuming
process
of reviewing and categorizing hundreds of
incoming
faxes. And, because of the sheer volume of both
structured and semi-structured documents that
they
needed to manage, whatever solution they chose
would
also need to be hyper-scalable.
To streamline document collection, data
extraction and validation along with automating
document distribution, the customer employed a
Dispatcher Stratus workflow to:
Capture fax documents from Upland InterFAX
Scan fax documents using Advanced Optical
Character Recognition (OCR) software
Route structured documents with a known
document
title to the appropriate queue for human
review
Route unstructured documents to an admin for
further review and routing
Empower users to make decisions on incoming
fax
documents
An example workflow is shown below:
Workflow Configuration
Upland InterFAX In
This node actively monitors incoming faxes
from
Upland's InterFAX digital fax service. Faxes
can
be dynamically filtered by a variety of
fields
including Caller ID, Message Size, and more,
to
ensure that Dispatcher Stratus is collecting
the
content that needs to be processed within
the
workflow.
Advanced OCR
The Advanced OCR node is configured to
extract
text data from the top of an incoming
document.
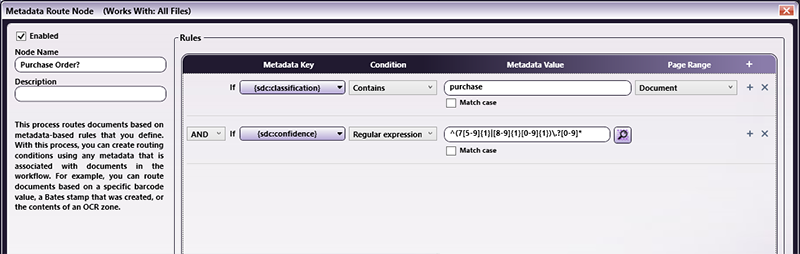
Metadata Route
The Metadata Route node is configured to
evaluate the OCR data extracted via the
Advanced
OCR node for a known document title.
People Group
This node sends jobs to a User Group's
Default
Member. Jobs can be reassigned to a
different
user in that user group. For example,
incoming
unstructured forms can be shared for input
between group members so that they can be
routed
accordingly.
People Queue
This node sends jobs to a department job
queue,
where queue members can claim jobs and
manually
process them as they have time. After
completion, the user can select whether to
send
the job out as an email or to end the
workflow.
Email Out
The Email Out node sends a preconfigured
email
regarding the document that was processed.
End
The End node ends the workflow, discarding
the
incoming fax without saving information.
End Result
Dispatcher Stratus provides a
comprehensive
solution that delivers tangible results and
engages
personnel fully and effectively when human
intervention is required. Customers can also
automate routing of their incoming faxes with no
human intervention.
Tip 19: Dispatcher
Stratus - Important Reminders for Configuring
People
Nodes
Step 1: Add Users and Configure User Roles
People-based workflows don't work
without
people! Make sure you've added the right users
to
your tenant. Then, make sure that the necessary
users have the appropriate roles for the jobs:
specifically, update the Advanced > Roles > Jobs
permissions. This is the minimum requirements
for
the People User node.
Step 2: Create and Configure User Groups
After your users have the necessary
permissions, you can group them by department,
by
job title, or however works best for your
organization. In fact, you can even assign a
default
role to a user group, so everyone in that group
has
the proper permissions! User Group nodes are
perfect
for processes that require delegation or tasks
that
may require assignment by a team lead.
Make sure to select a Default User for
your
groups - this user will be the primary recipient
of
jobs assigned to that group. These are the
minimum
requirements for the People Group node and are
an
important step toward creating Job Queues.
Step 3: Create Job Queues
In the Stratus web portal, navigate to
the
Job Queues page and select the “Manage Queues”
and
“+ Add New Queue” buttons. This allows you to
select
one of your preconfigured user groups and any
specific users of that group to have access to a
job
queue. For example, every member of the Human
Resources department might be in the HR user
group,
but only a few may belong to the “Hiring
Committee”
job queue. Job Queues must be created prior to
using
the People Queue node.
You are now able to properly set up any
of
the People nodes. These can be combined in
limitless
ways to meet the needs of your organization. By
completing these 3 simple steps, Dispatcher
Stratus
can transform your organization's processes from
the
ground up.
Tip 18: Dispatcher
Stratus Glossary
Dispatcher Stratus is a new product with
lots of new features. You've probably heard or
read
a lot of terms you're not familiar with or don't
understand in the wider context of the solution.
Here are some terms you might need to
know:
People Node: Dispatcher Stratus
ships
with three new People nodes available at launch,
the
People Group, People Queue, and People User
nodes.
These nodes allow for vital human interaction
within
a workflow, often alongside automation nodes.
When a
job or document reaches a People Node, it will
be
instantly available for the next person to
complete
the necessary manual action. Once a person has
completed the job, the user can send the job on
to
the next People Node for further manual
processing
or an automated process like document renaming,
intelligent routing or distribution.
People Group Node: This node
sends
jobs and associated documents to a User Group's
configured Default User, who can make edits to,
reassign, or approve/reject a job. For example,
you
can use the People Group node to send jobs to a
department when you don't know which individual
will
complete the task. Note that a People Group node
requires a configured User Group with a Default
User.
People Queue Node: This node
sends
jobs and associated documents to a configured
Job
Queue, where any member of the queue can claim
the
job on their timetable, make edits to or
approve/reject a job. For example, you can use
this
node to gather submissions for a contest with a
deadline or for gathering job applications that
can
be reviewed by any member of the hiring
committee.
Note that a People Queue node requires at least
one
Job Queue configured for a User Group.
People User Node: This node sends
jobs and associated documents to a specific
user,
who can make edits to, reassign, or
approve/reject a
job (based on their permissions). Use this node
for
jobs that require an action from a specific
person
to address.
User-Selectable Connector: Within
the
Workflow Designer, User-Selectable Connectors
have
been made available. When a User-Selectable
Connector is configured in the workflow, users
of a
connected People node can see the next step in
the
workflow and choose where to send jobs.
Job: A discrete collection of
form
data and/or documents that represents a task for
the
job owner to complete, either within Dispatcher
Stratus or outside of it.
Job Queue: A repository of jobs
waiting for user attention, associated with a
People
Queue node. These jobs remain in the queue until
they are claimed and completed. Jobs within a
Job
Queue are available to all members of a specific
queue.
User Group: A collection of one
or
more Dispatcher Stratus users. User Groups
require a
Default Member to be configured so that they can
be
used with People Group and People Queue nodes.
User
Groups can also have Roles (see below)
associated with them, granting the defined
permissions within the Role to any user in that
group.
Role: A collection of user
permissions creates a Role. Dispatcher Stratus
has a
full suite of user permissions that can be
configured so that users can be granted exactly
-
and only - the permissions they need. Users can
have
multiple roles, depending on the needs of your
organization.
Default Member: A member of a
User
Group who has been designated as the primary
member
to receive all jobs for that group. The default
member can respond to the job inquiry (for
example,
by rejecting it), reassign the job to other
members
within the group, or move the job forward to the
next step in the workflow.
Tip 17: ScanTrip Cloud Can Be Configured to Use a Custom Form
During MFP Panel Interactions
ScanTrip Cloud provides cloud based automation that interfaces with the devices in your
environment to enable a variety of scanning options. ScanTrip Cloud can also be configured
to provide the user with options during the scanning process.
One of the most common options for a user scanning a document is to provide the ability to
name the document something other than a default scan name. You can create and utilize forms
in ScanTrip Cloud that help you achieve this.
Building the Form
ScanTrip cloud provides a Form Management tool to create forms with the necessary fields and
options for use in a workflow.
The steps here will create a simple form with a single fillable field.
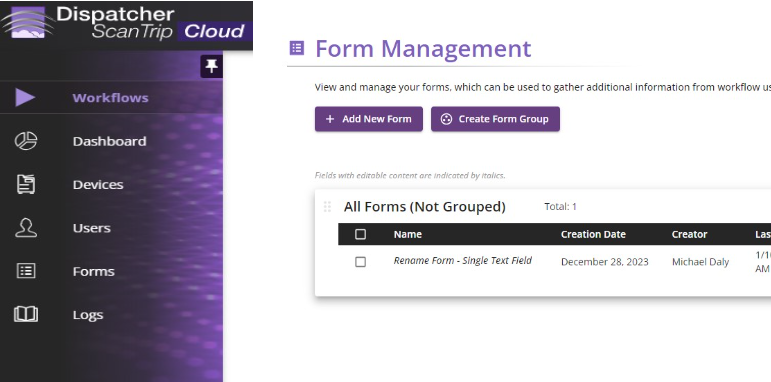
Select the Forms menu option.
On the Form Management page, select "Add New Form".
On the dialog that pops up, name your form and choose the Blank template.
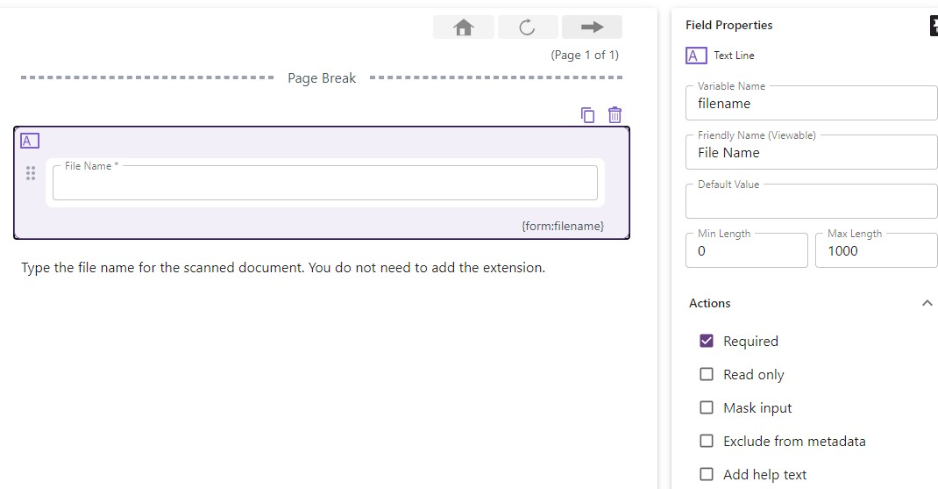
On the new Form canvas that opens, drag a text field from the list of standard index
fields.
Name your custom variable and friendly name for the new field.
Check the "Required" box.
Choose Save and Close.
Your form should look similar to this:
Add the form to your workflow
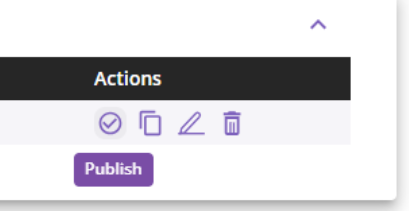
Now that you've created the form you need to publish it. This tells ScanTrip Cloud that the
form is usable by a workflow Form node.
Publish your form by clicking on the check mark in the form list.
Now that our form is published, it's time to add it to the workflow.
Open your desired workflow for editing.
Drag a Form Selector node to the canvas.
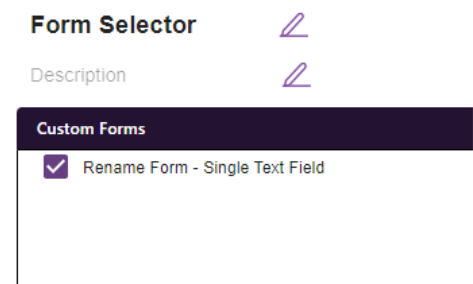
Open the Form Selector node configuration.
On the left hand side of the window, there is a list of custom forms. The form you
created in the previous step is now available and can be added to the Form Selector by
checking it off.
Save the node configuration.
The Form Selector will now display the rename form at scan time! Now that we are displaying a
form for the user to provide a file name, we can configure our Rename node!
Add or open a Rename node in your workflow.
Open the Rename node configuration.
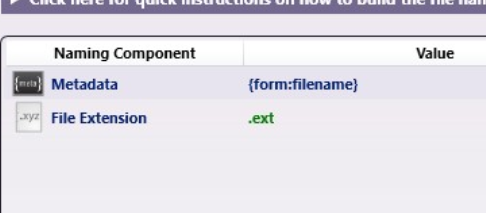
Add a custom metadata field to the naming components.
Select the metadata field that you created when making your form.
Make sure to include the file extension. Your final configuration will look like
this.
Save this node.
Save and verify your workflow. If you have other nodes to configure, such as output
nodes or other processing nodes, please do so.
Run your validated workflow!
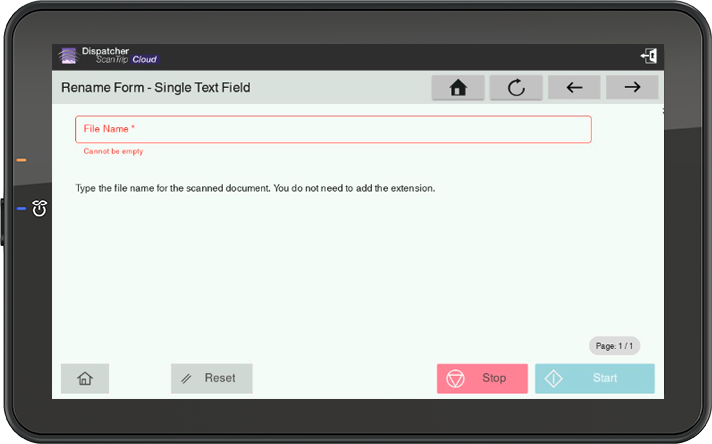
Using the form at the MFP panel
When a user interacts with this
workflow,
they will now be provided with the text field
for a
custom filename.
Choose the workflow from the currently running workflows in ScanTrip Cloud app.
Scan your document.
When the document has been uploaded, you will be presented with your form.
Since you made it "Required", the file name must be filled out. Do so and then choose
the next arrow to fill out any remaining custom or system forms that may be necessary
(such as a folder browser selection for SharePoint).
Your document will now be transferred to its destination and renamed according to the
field on the form! Well done!
Tip 16: Two for the
Price of One: Dispatcher ISO and Online Help
Today's Tech Tip actually has two tips!
Tip
#1 – Dispatcher Phoenix ISO Image (Dispatcher
Phoenix Suite)
An ISO image is essentially a complete
copy
of everything stored on a physical disk, USB
drive,
etc., compiled into a single file. The ISO image
for
Dispatcher Phoenix can be found online. Click on
this
URL to download the ISO.
This URL is permanent and ALWAYS points
to
the most current version of Dispatcher Phoenix.
This ISO includes the complete
Dispatcher
Phoenix suite of applications (Dispatcher
Phoenix,
Dispatcher ScanTrip, and Dispatcher Release2Me),
so
no matter what you are looking for, you can find
it
on this ISO. The ISO is over 7 GB in size, so
make
sure that you have enough space to download it.
You
can save it to a USB Memory Stick and then
"mount
it" as a drive on the server on which you plan
to
install Dispatcher Phoenix.
Benefits of using an ISO image:
Install Dispatcher Phoenix without an
internet
connection.
Easily transfer or share the ISO across
different desktops.
This ISO can also be used for updating Dispatcher
Phoenix. The same component pool found on SEC
servers is also contained within the ISO. Once
mounted, you can start Add-In Manager as an
Administrator and choose to install updates.
Make
sure to select the mounted ISO as the update
source.
Add-In Manager will automatically detect
the
mounted ISO.
Tip
#2 – Search Dispatcher Phoenix Help from any
desktop
or mobile device
For many years, Dispatcher Phoenix Help
has
been globally available via a cloud repository.
Thus, you can access Dispatcher Phoenix Help
from
any computer connected to the internet. The help
site is always up to date with the latest
information, and you can download or print a PDF
copy from the site for offline access. To access
Dispatcher Phoenix Help, visit the following
URL:
Dispatcher Phoenix Help is also
available in
Japanese. This translation is available from the
help site instantly, at the click of a button.
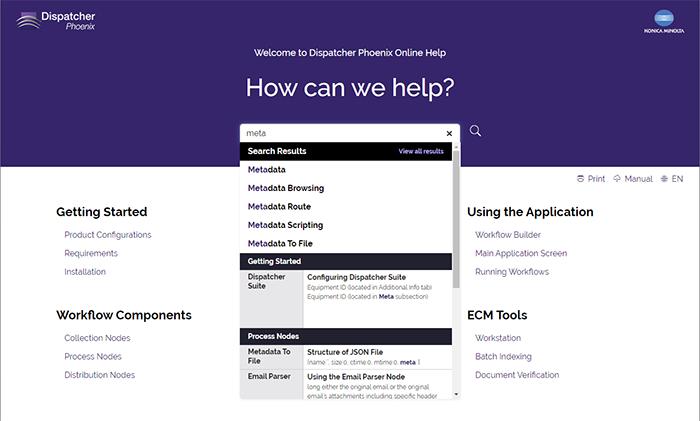
The help site's powerful search engine
uses
“type-ahead” functionality, returning results
after
entering just two letters. Results update as you
enter more characters, listing all topics in the
help that contain the search string.
Tip 15: An
Environment
Checklist Prior to Installing Dispatcher Phoenix
When planning to deploy Dispatcher
Phoenix
in a customer environment, there are a number of
“checks” that you can do to help streamline the
installation.
The following checklist encompasses
information that is available in the Dispatcher Phoenix Online
Help, as well as some helpful tips and
tricks to streamline the installation.
Step
Description
Confirm hardware requirements are
met.
Minimum hardware requirements can be
found in the Online Help.
Additional resources may be required
for
processing-intensive workflows.
Confirm OS version is supported and
fully
updated.
Dispatcher Phoenix OS support is in
line
with current Microsoft supported OS
and
OS versions.
NOTE: A system that is not
fully
updated may have problems installing
prerequisites or other components
with
OS dependency.
NOTE: If your customer is
using
WSUS, please contact SEC for
additional
information related to this service.
Confirm that prerequisites are
installed.
The Dispatcher Phoenix installer
(Add-In
Manager) will attempt to install any
necessary prerequisites for the
software
that can be obtained from Microsoft.
In environments where there are
restrictions or limitations due to
policy or security, we provide a list of
prerequisites that can be
installed prior to installing
Phoenix.
Confirm that Print Spooler is
installed
and active during installation.
During installation, the platform
installs print tools that require
the
print spooler to be active on the
system.
Confirm permissions of the installing
user.
The user that logs into Windows to
execute the Phoenix installation
will,
by default, be used to run the
workflows
under that account. This user
must be an Administrator of
the
local system.
We recommend the use of a service
account
so that individual user account
permissions and passwords do not
need to
be managed for Phoenix services.
In environments where user-based
services
accounts are not allowed, it is
possible
to use Microsoft managed service
accounts.
Confirm availability of components
for
Dispatcher Phoenix Web.
Dispatcher Phoenix Web uses Windows
Internet Information Services
to
provide access to the Dispatcher
Phoenix
Web interface. These items will be
installed and configured if not
already
on the system.
Confirm internet connectivity and
firewall access.
Dispatcher Phoenix's default
installation
method downloads components from the
web
and requires access to the internet
during the installation process.
In addition, depending on the
customer
environment, ports may need to be
made
available.
If the system being configured is not
allowed access to the internet,
please
see Tech Tip
14
for more information about offline
registration.
Confirm antivirus, anti-malware, etc.
are
disabled prior to installation.
Dispatcher Phoenix integrates heavily
with Windows and .NET. When writing
to
system directories, some anti-virus
and
malware detection will block
installation or use of key
components.
Confirm user account access for any
environment integrations, such as
database connections or other
services.
If a workflow is utilizing database
connections or other systems that
require credential access, the
account
being used to run the workflows will
need access. If alternative accounts
need to be used, this can be planned
prior to installation.
Consideration for Enterprise and Cloud-Hosted
Phoenix Installations
Confirm connectivity between
client
location and cloud services.
When installing in a cloud-based VM,
Phoenix requires a method of
communication with the customer's
on-prem environment in order to
provide
web experiences and integration into
environmental services such as file
shares and other line of business
applications.
Confirm that all Phoenix servers
in
the enterprise can communicate
with
each other.
In enterprise configurations for
Failover
and Offloading, the servers in the
cluster require network access to
each
other in order to offload job
information.
Additional Tips and Tricks
If installing a 30 day demo of Dispatcher
Phoenix, please note that all components
will be
downloaded and installed. If the demo system
has
limited bandwidth, consider downloading the
ISO
to install with, instead.
When installing with a valid purchase code,
only
the licensed components (in addition to
required
items) will be installed. If you would like
to
avoid installing everything, utilize the
customer purchase code during initial
installation.
The Dispatcher Phoenix installer will always
install the latest version of Dispatcher
Phoenix.
Tip 14: Installing
and
Registering Dispatcher Phoenix Without an
Internet
Connection
One of the tried and truest features of
Dispatcher Phoenix is the ability for the
solution
to be installed and registered in environments
that
do not have access to the Internet. This has
allowed
Dispatcher Phoenix to be installed in very
secure
environments or environments that do not allow
Internet connections.
To install Dispatcher Phoenix without an
Internet connection you can download the
Dispatcher
Phoenix ISO using this link.
The ISO image contains everything needed to
install
Dispatcher Phoenix, however, be aware that there
are
Windows Components that will also be installed
which, depending on the environment, may trigger
the
need to also perform a Windows Update. The
Dispatcher Phoenix ISO is a 7 GB download that
will
require sufficient time to download and space
available for the download.
Installing Dispatcher Phoenix
Copy the ISO to a USB Memory Stick and then mount
the
ISO on the PC where Dispatcher Phoenix is to be
installed. Open the ISO and choose the
appropriate
installer for example:
"Dispatcher–Phoenix-Setup-x64.exe"
Then, run the installer and continue this
procedure
once the Registration Window is displayed.
Registering Dispatcher Phoenix
In order to register Dispatcher Phoenix you will
need:
A Purchase Code (if registering the "Full"
version)
The Lock Code from the installation of
Dispatcher Phoenix
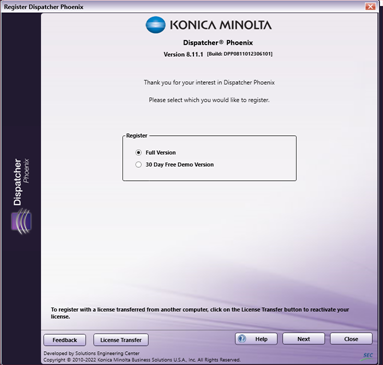
To begin the registration process, choose the
desired
registration type on the Register Dispatcher
Phoenix
screen. During this process, please make note of
the
"Lock Code".
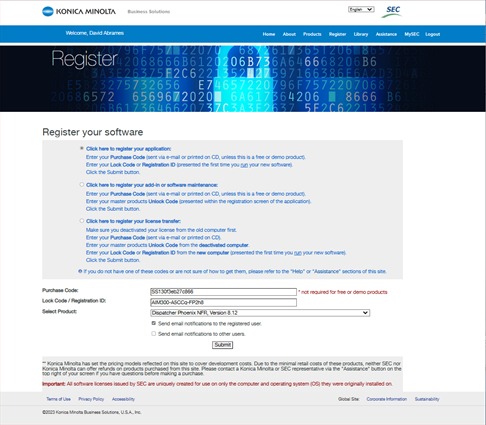
Using a PC that is connected to the Internet and
log
into the SEC User Account that will be used to
register Dispatcher Phoenix. From the Menu
choose
"Register". Enter the Purchase Code and Lock
Code
and then choose the version of Dispatcher
Phoenix to
register. Press "Submit" as shown below:
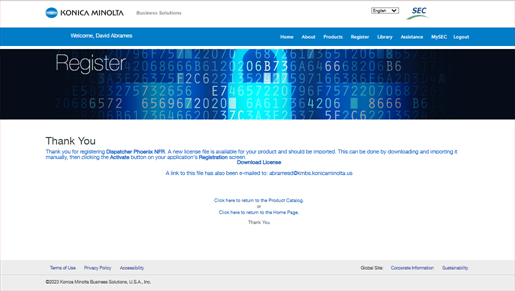
The Dispatcher Phoenix installation will be
registered and the confirmation panel will be
displayed.
Click the link to download the new License File
and
transfer the License File to the PC where
Dispatcher
Phoenix is installed.
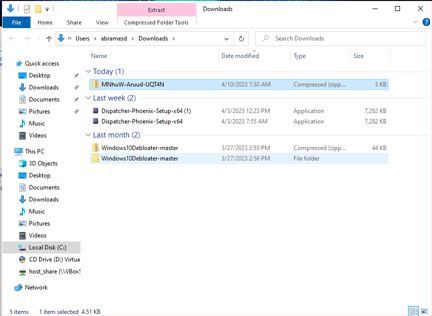
Return to the Dispatcher Phoenix Registration
Panel
on the server where Dispatcher Phoenix has been
installed and select “Manual Registration”.
Then,
browse to where the License File is located and
choose the file, then click the “Activate”
button.
A confirmation screen will be displayed that the
license has been installed.
Please note that Manual Registration works for
registering Add-In Licenses, including License
Reactivations, Enterprise Server Registrations,
and
License Transfers. In addition, for applications
or
add-ins that are free such as Dispatcher Phoenix
DEMO, an additional Purchase Code is not
required.
Tip 13: Streamline
Print
Operations with Automated Tray Calls in
Dispatcher
Phoenix
The Dispatcher Phoenix Workflow Metadata
is
a powerful tool that can be used to control
workflows as well as MFP features. For example,
we
can use Dispatcher Phoenix to simply and
effectively
facilitate Paper Tray calls when printing
documents
using Metadata that is retrieved using Advanced
OCR
from the contents of a document.
Use
Case
Customer receives a PDF document that
consists of multiple single page documents. This
"mixed" PDF document contains various single
page
document types, such as credit reports and
packing
lists. The customer wants to automate the
process of
splitting the large PDF file into separate
documents, and then print the pages on either
plain
white paper media or “pink” packing list paper
media. The customer normally loads plain white
paper
media into Tray 4 of their Konica Minolta MFP
and
the "pink" paper media into Tray 5.
The source PDF file is delivered into a
network folder and the workflow solution should
monitor this folder, delete the source PDF file
once
processed, split the PDF into separate pages and
print non packing list pages on plain white
paper
media from Tray 4, and packing list pages on
"pink"
paper media from Tray 5.
Solution
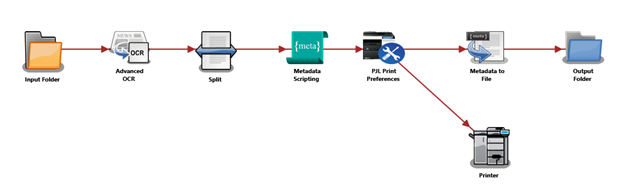
The following is the workflow that was
created for this customer.
Workflow Configuration
Input
Folder
This node is set to the folder that is to be
monitored by the workflow. The Input Folder
Node
will delete the retrieved file.
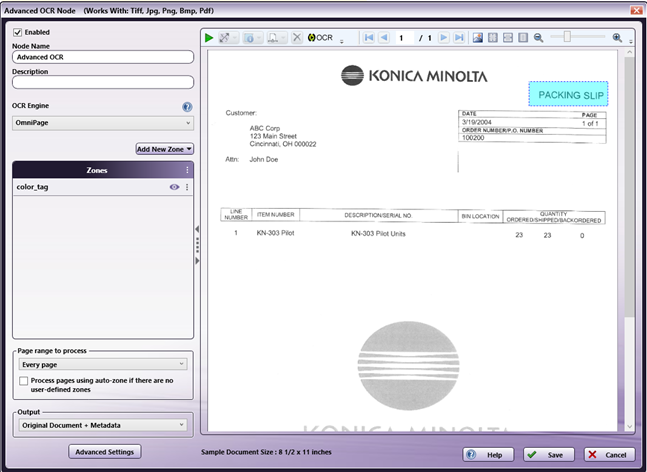
Advanced
OCR
The Advanced OCR node is configured to
capture
the text that is used to determine the Tray
Call. In this case we are looking for the
text
"PACKING LIST" in the upper right section of
the
page. We define the ZONE that will have the
text
that will tell the workflow the page is a
Packing List page.
Split
The Split Node separates each document page
into
a separate file.
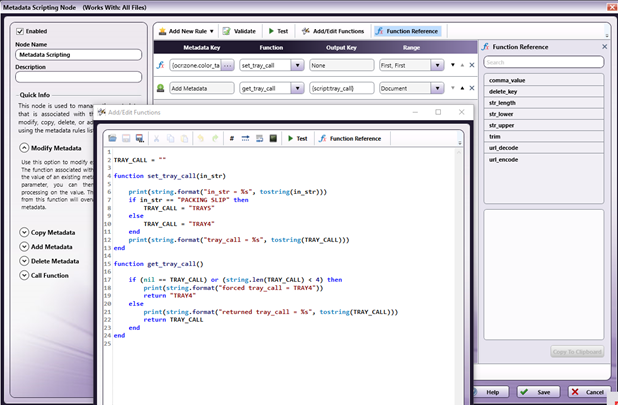
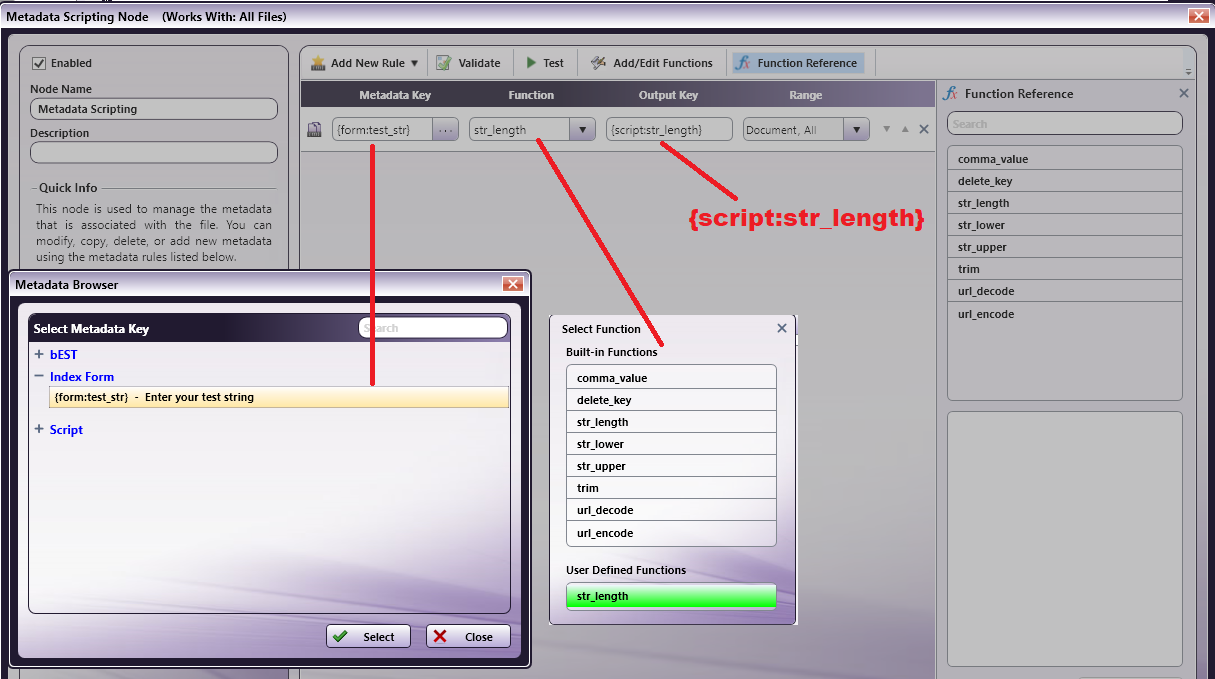
Metadata
Scripting
Node
This node will convert the captured text to
the
appropriate Tray Call metadata value. The
text
retrieved in the Advanced OCR Node is passed
to
the Metadata Scripting Node and checked to
see
if it is the text that signals that a
Packing
List page has been detected. The
"set_tray_call"
function will set the Tray Call metadata
value
to the appropriate value of either "TRAY4"
or
"TRAY5". The "get_tray_call" function then
copies the Tray Call value into the metadata
variable "{script:tray_call}". Which will be
used by the PJL Preferences Node.
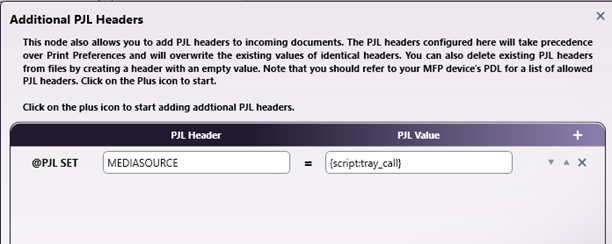
PJL Print
Preferences
This node accepts the Tray Call metadata
value
so that the page is printed on the correct
media. In the node, the "Advanced Settings"
button displays the "Additional PJL Headers"
entry. Here we enter the "MEDIASOURCE" PJL
Command and then using the
{script:tray_call}
metadata variable we can set the media
source to
the appropriate tray to print the document.
Printer
The Printer node sends the modified PDF file
to
the MFP for printing on the appropriate
media.
Metadata to File
Node and Output Folder
These two nodes are used to capture the
Workflow
Metadata during debugging and testing of the
workflow and are disabled for normal
operation.
Conclusion
Using the built in features of
Dispatcher
Phoenix we can very easily create a simple yet
powerful workflow that will automate and
simplify a
customer process. This workflow is easily
expandable
to other tray calls by adding Zone for other
text
that will identify the particular page and then
using the retrieved text and additional code in
Metadata Scripting to set other tray calls as
desired.
Whether you're looking to get up and
running
quickly or trying to solve a specific customer
need,
you can find many great ideas and examples on
our Sample
Workflows page.
Tip 12: Intelligent
Forms Processing Workflow for Medical Billing
Challenge
A customer processing 50 to 100 pieces
of
mail every day has to scan this mail and then
route
it to the appropriate OneDrive or SharePoint
Folders. The mail is not uniform, so key phrases
or
identifying text is located in various locations
on
a page, which leads to employee fatigue and a
high
rate of entry error. This is currently a manual
process and requires three employees about 4
hours
per day each to process. Due to COVID-19 and
related
manpower shortages, the customer wants to
automate
the mail scanning process, but has not been able
to
find a solution that works for them because of
the
lack of a standard format of the incoming mail.
Solution
Using Dispatcher Phoenix Forms
Processing
and its flexible data extraction features, the
lack
of any standard format was not an issue.
Combined
with the built-in ODBC Processing Node and
Custom
Lua Scripting for easy parsing text data, SEC
was
able to create a self-learning workflow solution
that was taught how to recognize the scanned
mail
and route it to the appropriate OneDrive or
SharePoint Folder.
This workflow was broken down into four
main
areas, as follows:
Scanning
The first part of the workflow is where the
user
scans the mail document at the MFP. The user
has
the option to manually choose the desired
OneDrive and/or SharePoint Folder to route
the
documentation to.
Reading
In this part of the workflow, the scanned
mail
document is “read” by the Forms Processing
Node,
which extracts key phrases and other
information
necessary to determine where the scanned
mail
document will be routed. The “read” block of
data from the scanned mail document is then
parsed against the stored key words and
phrases
in the workflow database. If a match is
found,
the scanned mail document is converted to
searchable PDF and then routed to its final
destination.
Learning
If no matching key word or phrase is found,
an
email notification is sent to a group of
employees, prompting one to review the
scanned
mail document and data extractions in a
web-based interface via Dispatcher Phoenix's
Batch Indexing module. Within the
web-interface,
the user can then edit the keyword phrase,
if
desired, and then choose the correct
OneDrive/SharePoint folder to associate with
the
keyword phrase. Thus, the Workflow ‘learns'
new
keyword phrases and proper folder routing
with
as little human intervention in the workflow
as
possible.
Routing
Once a match is found between the stored
keywords and phrases or when the user
chooses a
desired folder, the workflow will convert
the
and then route the scanned mail document
into
the OneDrive/SharePoint folder.
Benefits
This customer was able to gain the
following
benefits from their automated workflow:
Received a high rating during a HIPAA
Compliance
audit due to the built-in document security
of
Dispatcher Phoenix.
Greatly reduced the possibility of
accidental
exposure of sensitive patient data and
proprietary pricing data.
Reduced total weekly man hours from 60
person
hours per week to less than 2 hours per
week.
Improve responsiveness to inquiries from all
stakeholders including patients and doctors.
Conclusion
This complex workflow depends heavily on
the
advanced features of Dispatcher Phoenix to
provide a
robust and powerful, self-learning workflow,
that
requires little or no interaction from the user
except when associating a new scanned document
with
either a new or existing OneDrive/SharePoint
folder.
Tip 11: Automate
Your
Printing Operations with Dispatcher Phoenix
Recently, a client from the Education sector was
struggling with waste from printed reports that
were
not needed or too little reports being produced,
delaying meetings, etc. Multiple administrative
assistants had to spend days preparing and
printing
out the correct number of collated reports for
each
meeting attendee.
With Dispatcher Phoenix, the administrator now
only
needs to specify the number of copies needed as
part
of the file name and store the file in a folder.
Dispatcher Phoenix will automatically collect
the
files, evaluate their file names, and quickly
print
out the correct number of reports, efficiently
automating what would otherwise be a tedious,
manual
process, and freeing up employees' time to focus
on
more strategic initiatives.
The workflow was set up as follows:
Here's how it works:
File Collection - All reports are
stored
in a network folder. In this workflow,
Dispatcher Phoenix is set up to monitor that
folder, collecting any documents that come
in.
In this case, the workflow is not started
until
all documents to be printed are in the
monitored
input folder.
File Parsing - Each file name
includes
the number of copies that should be made.
The
Parser node is used to extract that number
value
as metadata for use later in the workflow.
If a
file does not follow that naming convention,
then it is ignored by the rest of the
workflow.
Print Settings / Printing - After the
Parser node, all appropriate files are sent
to
the PJL Print Preferences node, which
applies
print settings (1 copy, single-sided, and
stapled) before sending the file to the
printer.
At this point, a copy of the document is
sent to
the printer and another copy is sent to the
Metadata Route node.
Checking For Counter - The first
Metadata
Route node checks if a Counter script exists
for
that file. If it is the file's first time
through the workflow, this Counter variable
does
not exist so the file is passed to the
Metadata
Scripting node (“MAKE Counter”) to create
the
counter. If a Counter script already exists,
the
file is sent to the next Metadata Route node
(“Copy Limit Reached?)”.
Print Document Again - The “Copy
Limit
Reached” Metadata Route node is set up to
check
whether or not the file should be printed
again
by comparing the Counter variable value to
the
Parser node metadata that was created
earlier in
the workflow. If the values are equal, then
the
file is stored in the Output folder and does
not
need to be reprinted. If the values do not
match, then the file moves onto the last
Metadata Scripting node (“Increment”) to
increment the Counter script and sends the
document to be printed again.
With this workflow, the customer is now able to
prepare and print the correct number of reports
for
each attendee of their meetings, with very
little
manual effort required. Dispatcher Phoenix
helped
this customer save time and optimize their
printing
operations — an instant return on investment!
Tip 10: New Ways to
Automate Document Processing Based on Type
Recently added new features in Dispatcher Phoenix
provide new methodologies for automating the
processing of documents based on document type.
The new Dispatcher Phoenix Doc-Classifier node
provides a programmable and flexible method to
identify and classify documents in the workflow
and
then route the documents to the appropriate
processing leg of the workflow. The
Doc-Classifier
node automatically categorizes scanned
documents,
electronic files, etc., into pre-defined classes
using Dispatcher Phoenix's Optical Character
Recognition (OCR) capability. The node extracts
information, matches it against pre-defined
classification definitions, and produces the
following metadata values:
Classification - The detected
Classification Type or, if not detected,
“other”.
Confidence Level - A percentage
rating
indicating the probability the document was
classified correctly.
For example, let say that you have a customer who
needs to process purchase orders and invoices in
different ways, and the customer needs to filter
out
all other document types that may be included.
Your
customer has a low tolerance for error, so you
must
ensure that the workflow only processes
documents
that have a high degree of confidence of being a
purchase order or an invoice.
The Workflow
For this article, we will be using the
Doc-Classifier
Sample Workflow “Accounts Payable
Classification”
that can be found in the SEC
Samples Library.
This sample workflow accepts input from three
sources
(a Desktop/Network Folder, an Email Inbox, or
scanned from the MFP) and then uses the
Doc-Classifier node to detect the document type
and
assign a confidence level prior to routing the
document through to the correct distribution.
Please
note the following configuration steps:
The Input Folder should be configured to
collect
files from the folder on the network.
The Email In node should be configured to
collect files from your email server before
running the workflow.
The MFP Panel node has been configured to
run
using the MFP Simulator.
The Doc-Classifier node has been configured
for
Standard classification of Purchase Orders
and
Invoices.
The Metadata Route nodes searches for the
metadata created by the Doc-Classifier node
and
routes the documents accordingly.
The SharePoint Connector should be
configured to
distribute Purchase Orders to your
SharePoint
folder structure.
The Output Folder node is configured to
collect
Invoices and route them to the output folder
on
your desktop.
The Microsoft Exchange node should be
configured
to send email notifications to the desired
recipient when Doc-Classifier identifies a
document as "Other". This node must also be
configured for your email server before
running
this workflow.
A Default Error Node has been defined for
this
workflow. All files that go out of the
workflow
on error will be distributed to the Default
Error Node folder on your desktop.
Configuring for Document Classification
Let's take a deeper dive into how we've
configured
Doc-Classifier to facilitate document
classification
for purchase orders and invoices.
Using the Doc-Classifier node, we first choose
the
Purchase Order and Invoice classification
categories
from the standard temples included with the
node.
This configuration will classify documents into
three categories and apply the appropriate
metadata
key to the documents metadata to enable further
processing and routing: Purchase Order, Invoice,
or
Other. The Doc-Classifier node also calculates
the
confidence level - a measure of accuracy -
associated with the document's classification
and
stores that value as document metadata.
Using the Metadata Route nodes, we check the
Document
Classification metadata and then the Confidence
Level metadata to successfully route the
document to
the correct location. In this case, if the
confidence level associated to the document is
greater than or equal to 75%, the document is
routed
further through the Purchase Order distribution
process.
This is an example of a fully automated document
classification system that can be easily
modified as
the customer's needs change or expand. For
example,
if the customer decides they want to only
process
documents with a higher degree of confidence and
email the less confident documents to an
administrator that can be easily accomplished in
this workflow.
Tip 09: Sending
Email
Notifications via Dispatcher Phoenix
As more and more business processes become
automated,
employees may not always have direct access to
the
server where the automated processes are
running. In
this case, users may want to receive feedback
about
the automated processes so that they can be
monitored. Dispatcher Phoenix has several
built-in
tools that allow for workflow monitoring,
including
the ability to receive automated notifications.
A
workflow that has been designed with automated
notifications built-in provides even more value
to
the user. This Tech Tip will go over some ways
you
can add automated notifications to any workflow
and
provide suggestions for best practices when
doing
so.
Overview Of Dispatcher Phoenix Transitions
First, let's look at how the workflow can be
designed
using Dispatcher Phoenix's Workflow Builder
tool.
Each Dispatcher Phoenix node has at least 2
(two)
output paths: one is called “Normal” and the
other
is called “Error”. In addition, there are some
nodes
that are used to make decisions; these kinds of
nodes have 3 (three) output paths: “Yes”, “No”
and
“Error”. Because of this flexibility, the
designer
of the workflow can choose how and where files
transition through the workflow. Since each node
has
an Error path, the workflow can be set up with
error
handling paths. Depending on the design of the
workflow, this error handling can be as simple
as
informing an administrator that an error has
occurred via email or performing a sophisticated
error recovery task when an error occurs.First,
let's look at how the workflow can be designed
using
Dispatcher Phoenix's Workflow Builder tool. Each
Dispatcher Phoenix node has at least 2 (two)
output
paths: one is called “Normal” and the other is
called “Error”. In addition, there are some
nodes
that are used to make decisions; these kinds of
nodes have 3 (three) output paths: “Yes”, “No”
and
“Error”. Because of this flexibility, the
designer
of the workflow can choose how and where files
transition through the workflow. Since each node
has
an Error path, the workflow can be set up with
error
handling paths. Depending on the design of the
workflow, this error handling can be as simple
as
informing an administrator that an error has
occurred via email or performing a sophisticated
error recovery task when an error occurs.
The Default Error Node
In addition, the workflow has an overall output
path
called the Default Error node. The Default Error
node provides a default exit path when an
unexpected
error occurs within a workflow. Any Dispatcher
Phoenix node can be assigned as the Default
Error
node and is called by the workflow when a node
within the workflow fails or has an error and
there
is nothing connected to the Error path of the
affected node. Typically, the Output Folder node
is
used; however, in some workflow designs, another
node is more helpful, such as the SMTP Out node,
which sends an email to a specific email
recipient
when an error occurs which includes the file
being
processed at the time of the error attached to
the
email. Not only does this notify a designated
administrator that an error occurred but the
file
being processed at the time of the error is
preserved so that the administrator can take
appropriate action.
The Default Error Node can be set up via the
Canvas
Properties in the Workflow Builder tool, as
shown in
the following illustration:
Sending Error Notifications from a Specific Node
Although the Default Error node is a convenient
feature for error handling, there may be
instances
when it is necessary to have an Error path from
a
specific node. For example, it may be necessary
to
create a specific notification with a customized
message and other details to send to an
administrator when an error occurs from a
specific
process. That would not be possible when using
only
the Default Error node.
For example, if an Annotation node, which uses
metadata to automatically create the annotation,
fails for some reason, the metadata can be
included
in the message sent to the administrator.
See the following illustration for how you could
set
up an SMTP Out node to send an email with
Annotation
metadata if the Annotation node fails:
Choosing the Error Path from a node is easy using
the
Workflow Designer tool. Select the connector and
access the Connector Properties panel on the
right-hand side of the Designer tool. By
default,
the “Normal” path is selected. To change this,
you
should do the following:
Unselect the “Normal” icon.
Click on the “Error” icon as illustrated
below.
NOTICE that when the “Error” path is
selected on
a connector, a circle with a “X” appears on
the
connector.
Sending Informational Notifications
You can also send notifications that are
informational at any point in the workflow. For
example, you can add an SMTP Out node on the
“Normal” path of an Output Folder node, allowing
email notifications to be sent when files are
successfully saved to their destination folder.
This
can be very useful for sending a notification of
success to users when documents have been
scanned,
processed, and stored (e.g, a user scans a large
document and wants to be notified when the
workflow
has finished processing the document). And since
the
SMTP Out Node can use metadata in the workflow,
the
notification sent to the user can also include
information like file name, folder path and any
other useful information.
See the illustration below for an example of this
workflow:
Best Practices
Always set a Default Error node for all of
your
workflows. This will help with debugging
workflows you have written. In addition,
you'll
never have to worry about losing a document
due
to an error in the workflow.
If using the Output Folder node as the
Default
Error node, make sure the folder path is
permanently available. It is strongly
suggested
that the folder path be local to the PC
running
Dispatcher Phoenix and NOT a Network
resource.
If the Network goes down for some reason,
the
Default Error node will likely fail as well.
We
recommend using
“C:\Users\Public\Documents\ERROR-FOLDER”
since
this is a safe location on the PC running
Dispatcher Phoenix. It will always be
available
and will never have permissions issues,
regardless of the user permissions of the
running workflow.
Give each node in your workflow a unique
name
that is associated with the work that the
node
is performing. The name assigned to a node
is
what will appear in the Workflow Log. This
can
really save you time when trying to
determine
which node is failing.
Any critical process or node in your
workflow
should have a separate Error output so that
additional metadata can be captured. This
can
really save you time and effort when
debugging a
workflow.
For a sample workflow that sends out email
notifications, please click here.
Tip 08: Metadata
Scripting for Advanced Workflows (Part 3)
To create a custom script for your workflow, you
can
use Dispatcher Phoenix's Metadata Scripting
node.
This Tech Tip walks you the basics of creating a
LUA
script. Please note that the Dispatcher Phoenix
Online Help documentation covers the Metadata
Scripting node in detail. Please go to Dispatcher Phoenix Online
Help before reading further.
To create a script, follow these
steps:
In the Dispatcher Phoenix Workflow Builder
Tool,
open the Metadata Scripting node;
then
click on the Add/Edit
Functions
button in the Tool Bar, as illustrated
below:
The Add/Edit Functions text
editor
opens. This simple editor is where you
create/update your script functions. This
node
comes with a list of built-in functions
(listed
in the Function Reference area on the
right-hand
side of the node configuration window). When
you
click on a built-in function, the function
code
is displayed in the code window below the
list.
Using the buttons below the code window, you
can
'Insert' the selected code into the editor,
or
copy the selected function to the clipboard.
Let's begin with the
str_length
function, which returns the number of
characters in a string. Select the
'str_length' function in the Function
Reference area; then click the
Insert button.
Let's look closer at this function and see
what
is happening.
Looking at Line 1, the double hyphen
(-
-) indicates that this line is a
'Comment'. Comments allow you to
enter a
detailed explanation of the function
and
code that the function executes.
This
can be very helpful as it allows you
to
enter concise details of what the
function does and how the function
works.
On Line 3, the function is defined.
The
syntax is the word 'function'
followed
by the name of the function (in this
case, 'str_length') and then the
parameter list in parentheses
'(str)'.
Note that the function name cannot
contain spaces, which is why we use
the
underline character between 'str'
and
'length' (i.e., 'str_length').
Next, skip to Line 5 and you see the
word 'end'. This is a signal to the
LUA
scripting engine that this is the
end of
the 'str_length' script function.
Every
line between the function definition
(Line 3) and the 'end' (Line 5) are
the
statements that the LUA Engine will
execute when the function is called
by
the Metadata Scripting node. This is
a
very simple function; it only has
one
statement ('return
string.len(str)').
But there is a lot going on in this
one
statement. Here is an overview:
'return' tells the LUA
scripting
engine to return the value
that
follows the word 'return' to
the
Metadata Scripting node.
'string' is a collection of
functions that work with
string
values.
'.len' is a function in the
collection 'string' that
returns
the length of the string
that is
passed to it ('str').
The variable 'str' is passed from
the
Metadata Scripting node into the
'str_length' function. The variable
'str' contains the string that is in
metadata and the 'str_length'
function
returns the length of the string to
the
Metadata Scripting node.
If you are wondering what a variable is,
think
of it as a place where some arbitrary data
is
stored. Variables are used to pass data into
the
function, and hold data as the function
performs
some task. In this example, 'str' is the
only
variable used and it is an input variable.
You can test your function in the editor by
clicking on the Test button in
the
toolbar. In the Test window, do the
following:
Select the down arrow in the
Function
field; then choose your function
from
the User Defined Functions
list.
See the illustration below for an
example:
Enter a sample string in the Sample
Data
field.
Click the Run Test
button.
The Output/Console window will
display
with the results of the test. As shown in
the
illustration below, the sample data is the
string 'This is a test' and the return value
('Result') is '14'.
Once you have created and tested your
function,
you can then click the Save
button
in the toolbar to save your work and make
the
function available to the Metadata Scripting
node.
In the Metadata Scripting node, you can
choose
the type of rule you want to create. For
example, you may want to copy existing
metadata
to a new metadata key. Do the following:
Choose Copy Metadata from the
Add New Rule drop-down
list.
Select the ellipsis button next to
the
Metadata Key field to open up the
Metadata Browser and choose the
metadata
variable that you would like to use
as
the source of the string to get the
length of.
Select the arrow next to the
Function
field to choose your User Defined
Function (i.e., str_length).
In the Output Key field, enter a new
metadata tag variable that you would
like to create (i.e.,
'{script:str_length}').
Keep the default selection for the
Range
field as "Document,All".
Check the Enable verbose logging for
rules box at the bottom of the node
configuration window.
See the following illustration for an
example:
Workflow Results
I created a simple workflow to test this. In the
workflow, users can enter a string at the MFP
panel
via a Dispatcher Phoenix Index Form and then
scan a
document. Once the document is scanned, the
Metadata
Scripting node calls the 'str_length' script,
which
counts the length of the string that was entered
in
the Index Form. The workflow uses the Metadata
to
File node to capture and store the metadata in a
separate text file so that we can review how the
script worked.
First, let's review the workflow log. See
below:
As you can see by the highlighted text, the
Metadata Scripting node read the string from
the
Index Form and created a new metadata tag
with
the value of 38.
To further show that the Metadata Scripting
node
provided the output we are expecting, see
the
results from the Metadata To File node
below.
In Summary
We've walked through a very simple example, using
the
Metadata Scripting node to show how easy it is
to
create a script function to create metadata
automatically. As you can see, no real
programming
experience was necessary!
In the next article, we'll show you how to create
a
slightly more complex script with more than one
function. We'll also talk about troubleshooting
scripts, how to use more than a single variable,
and
how to deal with page level and document level
metadata variables. If you have any questions,
please let us know at sec@kmbs.konicaminolta.us.
Tip 07: Let Metadata
Scripting Help. Overview of the Dispatcher
Phoenix
Metadata Scripting Node (Part 2)
Welcome back! In the last email newsletter, we
gave
you a brief overview of the many ways Metadata
Scripting can be used to help automate document
processing and routing tasks. This time, we will
go
into how to create a metadata script. If you
missed
Part 1, you can find it here: Overview
of the Dispatcher Phoenix Metadata Scripting
Node (Part 1)
Dispatcher Phoenix's advanced Metadata Scripting
node
allows you to manage, modify, copy, delete, and
add
metadata associated with the files in your
workflow.
To show how to use this node, we will teach you
how
to create a metadata key that records the
processed
document's character count. This processing
capability is extremely useful, especially for
file
storage systems that implement a character limit
for
documents and file names.
Please note that when creating a LUA Script for
the
Metadata Scripting node, you can use the editor
found within the node. For more in-depth
information
on how to use the Metadata Scripting node,
please
review the online
help documentation prior to configuring
the
node.
Before learning more about the functionality
Dispatcher Phoenix's Metadata Scripting node
offers,
please do the following:
Create a new workflow by opening Dispatcher
Phoenix's workflow builder.
Drag-and-drop the following nodes (in this
order) and connect each: bEST,
Metadata Scripting, Metadata to
File, and Output folder.
Open the bEST node and:
Add the MFP Simulator
Attach a new (blank) Index Form.
Within
the Index Form, drag the Text field,
and
give it a friendly name.
Select 'Save.'
Open the Metadata to File node and
check
the 'bEST', 'Index Form', and 'Script'
boxes.
Open the Output folder and select the
directory you want to distribute the
processed
file to. Your workflow should look like
this:
Now you are ready to create a script, which is
actually very simple. Please follow these steps:
Open the Metadata Scripting node and select
the
Add/Edit Functions button on
the
Tool Bar.
The Add/Edit Functions text editor
will
open. This simple Editor can be used to
create/update the script functions that this
node will use. On the right is a list of the
built in functions that come with the
Metadata
Scripting node. When you click on one, the
function code is displayed in the code
window
below the list. Using the buttons below the
code
window, you can insert the selected code
into
the Editor, or copy the selected function to
the
clipboard. Let's select the
str_length function and then
click
the Insert button.
Let's look closer at this function and see
what
is happening.
On line 1, the double hyphen '- -'
indicates that this line is a
comment.
Comments allow you to enter a
detailed
explanation of the function and code
the
function executes. This can be very
helpful as it allows you to enter
concise details of what the function
does and how the function works.
Line 3 is the definition of the
function. It is the word 'function'
followed by the name of the function
'str_length' and then the parameter
list
in parentheses '(str)'. Note that
the
function name cannot contain spaces,
which is why we use the underscore
character between 'str' and 'length'
(e.g., 'str_length').
Next skip to Line 5 where you see
the
word 'end'. 'End' is a marker to the
LUA
Scripting Engine that this is the
END of
the script function, 'str_length'.
Every
line between the function definition
(Line 3) and the 'end' (Line 5) are
the
statements that the LUA Engine will
execute when the function is called
by
the Metadata Scripting node. This is
a
very simple function; it only has
one
statement 'return string.len(str)'.
But
there is a lot going on in this one
statement:
'return' tells the LUA
Scripting
Engine to return the value
that
follows the word 'return' to
the
Metadata Scripting Node.
'string' is a collection of
functions that work with
string
values.
'.len' is a function in the
collection 'string' that
returns
the length of the string
that is
inputted into Metadata.
The variable ‘str' is passed
from the Metadata Scripting
Node
into the function
'str_length'.
The variable 'str' contains
the
string that is available in
Metadata and the function
'str_length' returns the
corresponding value to the
Metadata Scripting Node.
So what is a variable? Think of a
variable as a place where some
arbitrary
data is stored. Variables are used
to
pass data into the function, and
hold
data as the function performs some
task.
In this example, 'str' is the only
variable used and it is an Input
Variable.
Using the Editor, you can test your function
by
clicking on the Test button in
the
toolbar and then choosing your function from
the
User Defined Functions list. Enter a
sample string into the Sample Data
field,
such as "This is a test," and then click the
Run Test button. The
Output/Console window will display
the
results of the test. As you can see, the
test
data is the string 'This is a test' and the
return value ('Result') is '14'.
Once you have created and tested your
function,
you can then click the Save
button
in the toolbar to save your work and make
the
function available to the Metadata Scripting
Node.
In the Metadata Scripting Node, you then
choose
the type of rule you want to create. In this
example, do the following:
In the Add New Rule
drop-down,
select Copy Metadata.
Next, choose the Metadata Variable
to be
the source of the string to get the
length of using the Metadata
Browser.
From the Function drop-down, choose
your
User Defined Function (e.g.,
str_length).
Create a new metadata tag variable.
For
this example, enter
'{script:str_length}'. Leave the
Range set at the default
Document,All and at the
bottom
select the Enable verbose logging
for
rules checkbox.
Before leaving the Metadata Scripting node,
select Save and start your
workflow.
The workflow you created allows you to enter
a
string with the index form during scanning
time.
Open the MFP Simulator, and enter any label
in
the field you created (step 3b of the
initial
setup). Then input the file you would like
to
test with.
After the file processes through the
workflow,
access the folder your output is pointing
to.
Here you will find two files: the original
document and an XML file. Open the XML file
and
you will see how the Metadata Scripting Node
uses the str_length script by
measuring the length of the scanned
document's
string. We then use the Metadata to File
Node to
capture the metadata to a file, and then we
can
review how this script worked. Let's review
the
workflow log:
As you can see, the Metadata Scripting
Node
reads the string from the Index Form and
then creates a new metadata tag with the
value of 38.
Conclusion
We have walked through a very simple example of
using
the Metadata Scripting Node to show how easy it
is
to create a script function, which performs
tasks
that are not possible from other nodes. In
addition,
no real programming experience is necessary as
we
created a new script based on an existing
script.
Attached to this script is the sample program
created for the Tech Tip so you can review the
workflow and the nodes and then experiment on
your
own.
In Part 3 of this Tech Tip we will conclude our
discussion of the Metadata Scripting Node by
creating a slightly more complex script with
more
than one function, talk about troubleshooting
scripts, using more than a single variable and
how
to deal with Page Level metadata variables.
Again,
if you have any question please let us know at
sec@kmbs.konicaminolta.us.
Tip 06: Let Metadata
Scripting Help. Overview of the Dispatcher
Phoenix
Metadata Scripting Node (Part 1)
The Metadata Scripting node is one feature that
seems
to intimidate users of Dispatcher Phoenix. When
our
engineers are asked if Dispatcher Phoenix can
perform a specific, complex operation for a
customer, we often respond, "Yes, that can be
done
with the Metadata Scripting Node." And the
reaction
we get is "That is too difficult!" Or, "I can't
do
that. I'm not a programmer."
But, the truth is, this node does not require a
lot
of advanced programming expertise. In fact,
although
some programming experience is helpful, it is
possible to create scripts using the Metadata
Scripting node with very little programming
skills.
What Can the Metadata Scripting Node Do?
Here are some examples of some of the things that
can
be done with Metadata Scripting:
Convert Page Level Variables to Document
Level Variables. This makes access
to
variables easier and less error prone.
Manipulate metadata values (e.g., modify
metadata variable values), along with
splitting or merging metadata values.
If
a file has many variables (name, date,
number of
copies), these variables can be easily
modified
so that specific information can be
extracted.
On the flipside, variables can be merged for
files that include a lot of information.
Create new metadata from existing
metadata
values. Allows user to make
decisions
based on a metadata value. For example, if
user
wants to change the format of “Yes/No” to
“True/False,” this feature can do this
easily.
Count pages and count documents.
Allows
the user to automatically determine how many
pages and/or documents there are after a
print
job.
Reformat metadata values for other nodes
in
the workflow. The MFP cannot
determine
numerals that are written out (one, two,
three)
vs. those that are written in a number
format
(1, 2, 3). Reformatting converts one value
into
another so that the MFP can recognize it.
If there is a need to edit, update or create
metadata
values in a workflow, that is a perfect job for
the
Metadata Scripting Node.
Where Can I Get More Information?
Dispatcher Phoenix uses a modified Lua Scripting
engine to support scripts created in the
Metadata
Scripting Node. For more information about Lua
scripting, you can:
Go to the Lua scripting website at http://www.lua.org.
This website includes documentation and
examples
of Lua scripts.
You can also get help from SEC's
International
Service and Support (ISS) group by emailing
sec@kmbs.konicaminolta.us.
Just remember that Dispatcher Phoenix does not
support all of the features of Lua, such as File
and
System functions.
In Part 2 of this Metadata Scripting Node series
we
will take a closer look at how you create
Metadata
Scripting functions and scripts.
Tip 05: Recommended
Scan
Settings for Best Barcode Recognition
Dispatcher Phoenix offers powerful barcode
processing
features for both standard and 2D barcodes. With
an
automated workflow, files can be automatically
split, renamed, annotated, routed, indexed and
more
based on the barcode that is detected. There may
be
occasions, however, when the barcode on a
document
is hard to read. In this case, you should follow
best scanning practices to increase the accuracy
of
the barcode recognition.
Recommended Color Modes
When scanning your document, you can choose three
color modes: black and white, grayscale, or
color.
For best barcode recognition, we recommend
scanning
the document in black and
white. If
a document is scanned in full color or grayscale
mode, the MFP will try to match the scanned
color by
softening the edges of straight lines, making
the
barcode more difficult to detect. Scanning in
black
and white will result in sharp edges and clear
bars
in the barcodes.
Recommended Resolution
If you must scan in full color or grayscale,
choose a
higher resolution, such as 300x300 or 400x400.
Although higher resolutions result in large
image
files and longer processing time, barcode
recognition will improve.
Barcode Processing
Workflows
With Dispatcher Phoenix's Barcode
Processing,
files can be automatically renamed, indexed,
annotated, split, routed, and more. Visit
our sample
workflow library and search for
"barcode" to download and start using
a
sample Barcode Processing workflow
today.
Note: Barcode Processing
is
included with Healthcare, Finance,
Government and ECM editions. It is
available
as an option for all other editions of
Dispatcher Phoenix.
Tip 04: Quick Way to
Test Your "Scan to Email" Workflow
Scanning business documents, such as contracts
and
proposals, and then emailing them as attachments
helps reduce paper and mailing costs. And with
Dispatcher Phoenix, you can easily create a
powerful
workflow to scan, process, index, and email
documents to specific email recipients. But what
if
you want to test your "Scan to Email" workflow
without having to connect to an email server?
With Dispatcher Phoenix's SMTP In node, this is easy to configure!
A typical Dispatcher Phoenix "Scan to Email"
workflow
uses the SMTP Out node, which requires specific
connection information to be specified, such as
the
IP address for the outgoing SMTP email server,
the
Port used by the server for SMTP communication,
the
username and password of the email server
account,
and more. And if the SMTP Out node is not
configured
properly, errors will occur when the workflow
runs.
Using SMTP In to Act as an Email Server
However, Dispatcher Phoenix also has an SMTP In
node
that can be configured to act like an email
server.
The SMTP In node would accept email from your
"Scan
to Email" workflow. To begin, you should create
a
simple workflow with an SMTP In
node and Output node. See the following
illustration for an example of a simple SMTP In
workflow that you could create:
In this workflow, the SMTP In node would be
configured with the Local Address 127.0.0.1. See
the
following illustration for an example:
Note that this SMTP In workflow must be running
when
you set up the SMTP Out workflow next.
Setting Up Scan to Email
Now, with the SMTP In node set up to act as an
email
server, you can create a Scan to Email workflow
in
which the SMTP Out node sends emails to the SMTP
In
node in the previous workflow. See the following
illustration for an example:
In this particular workflow, an Index Form is set
up
to prompt the MFP user to enter the email
address to
send the scanned document(s) to. When the
workflow
is run, the scanned document is converted to PDF
and
then sent out as an email attachment...all
without
connecting to an email server!
Here's how to include a list of running
processes on
your system
There are several resources available to help you
identify or resolve any unexpected behavior when
using Dispatcher Phoenix. One of them is a
Windows
command called TaskList, which
lists all processes (running and non-running) on
your system and allows you to output the list to
a
text file. This is ideal to use in situations
when
you are either unable to open the Windows Task
Manager or you want to print out the list of
processes. And the text file that is created can
be
attached to Dispatcher Phoenix Customer Feedback
to
provide additional information about your
system.
Here are the steps to take to create detailed
reports
of running and non-running processes:
Open an Administrator Command Line by
right-clicking the cmd.exe file and
selecting
“Run as an Administrator."
Change the directory to the Desktop Folder.
Enter the following commands one at a time
at
the Command Prompt. Allow each command to
complete before running the next one. Each
command will add more details to the
tasklist.txt file.
tasklist /apps /fo csv >> tasklist.txt
tasklist /svc /fo csv >> tasklist.txt
tasklist /m /fo csv >> tasklist.txt
tasklist /v /fo csv >> tasklist.txt
Open Customer Feedback and click the
“Options”
button (on the lower left side of the
window).
Enable all of the additional information
options
and click the “OK” button.
Enter “Additional log and task list
information
capture” into the Description field of the
Customer Feedback.
Drag and drop the “tasklist.txt” file from
the
Desktop into the Customer Feedback files
area.
Include an exported copy of the workflow and
any
sample files as well.
Save the Customer Feedback to the Desktop;
then,
attach this file to a Support Ticket for
further
review.
If you receive an error on the MFP panel about
failing to connect to the workflow, please try
the
following steps to resolve the issue:
Confirm the bEST Server settings on the
Defaults window (accessible from
the
MFP Registration Tool). The bEST
Server IP Address must match the IP
Address
of the PC running Dispatcher Phoenix. If
the
IP Address does not match, the MFP will
not
be able to connect. See the following
illustration for an example of the
Defaults
window:
Check your Firewall and Anti-virus
settings.
Go to the MFP's Web Browser and
enter
the IP Address of the bEST Server
and
port 50808 and you should get an
"Access Denied" message. If not, the MFP
is
being blocked from connecting.
URL Example:
http://11.22.33.44:50808/
(where 11.22.33.44 is the IP Address of
the
PC running the bEST Server)
Check that the MFP is not using a SHA-1
SSL
Certificate.
When setting up a domain user version of conopsd,
the
domain user conopsd has to have
specific privileges on the PC that will be
running
Dispatcher Phoenix in order to work correctly.
After
setting up the domain user
conopsd,
make it an admin of the PC running Dispatcher
Phoenix and then go into Local Security Policy
(Local Policies=>User Rights
Assignment) to assign these
privileges
manually. This is most often required for
Worldox
GX3 and GX4 in an Active Directory environment.
The privileges are as follows:
Access this computer from the network
Act as part of the operating system
Adjust memory quotas for a process
Back up files and directories
Bypass traverse checking
Create a token object
Debug programs
Enable computer and user accounts to be
trusted for delegation
Impersonate a client after authentication
Log on as a service
Replace a process level token
Restore files and directories
Be aware that, depending on how your Active
Directory
Domain is configured as well as the settings in
the
Domain Group Policy, these privileges may not
stay
set. Your Domain Administrator should configure
these settings for the Domain User
conopsd so that the user profile
will
keep these settings.
Have you ever wanted to improve the look
of
your workflows that are run at the MFP? Does the
displayed workflow look bad or just doesn't
convey
the message you want? The following Tech Tip
will
show you how to put any image you want as
the
displayed workflow image at the MFP.
The first step is to create your workflow with
the
proper size and dimensions. The image that is
displayed within the workflow screen (see image
above) is square. Therefore, you want your
workflow
to be square to best fit that space. For best
results with respect to scaling, set your
workflow
to be 800 pixels square.
Under Page Settings in the workflow
builder,
set the Size as "Custom Size".
Then,
select "pixels" for one of the dimension
units (the other will change automatically to
match)
and set both Width and Height to
"800".
Now that your workflow is sized properly, your
first
thought is probably to start adding nodes. Not
yet!
Before you add any nodes, find the image that
you
want displayed next to your workflow on the MFP.
It
could be anything from a conceptual image to a
company logo ... or even something completely
unrelated that you just happen to like. Use
whatever
image editing program you might have to size
that
image to 800px by 800px.
Once you have your 800x800 image, set it as the
background for your workflow.
Under Background Image, check the
"Enable" box.
Click the "Select Image" button and
choose your image.
You can see in the image below, that we have
sized
our workflow and set our image to be the
background.
Now we need a place to build the workflow. Rather
than clutter the nice, new image, let's add a
second
page. In the top menu, select Insert >
New
Page (or press CTRL+Ins)
to
add a second page.
The new page has the same background as the
first,
which might not display the workflow very well.
To
help, place a square shape over the entire page.
White works well for building upon. If you want
the
background image to show through a little, set
the
shape's Opacity (transparency) setting
down a
little until the proper effect is achieved.
Now you are ready to build your workflow! Just
add,
connect and configure your nodes on page two.
The
resulting workflow will have your custom
image
displayed with it on the MFP.
In many server environments, a user may configure
the
primary Windows Drive with only enough space to
run
Windows or may be using a Solid State Drive. In
Dispatcher Phoenix workflow configurations where
the
workflow is using the OCR Engine to process
files,
(i.e. Advanced OCR, Forms Processing, Convert to
PDF, etc.) the workflow can create a large
number of
temporary files. Furthermore, these temporary
files
can be as large as three times the size of the
file
being processed.
All of these temporary files can quickly use up a
lot
of hard drive space, resulting in issues with
the
Dispatcher Phoenix threshold monitor. The
threshold
monitor prevents Dispatcher Phoenix workflows
from
consuming all of the available hard drive space
and
RAM Memory space and will stop running workflows
when the threshold limits are reached.
In such situations the user may want to move the
location of Dispatcher Phoenix temporary files
to a
different hard drive, thus preventing issues
with
Windows and improving overall performance.
The Dispatcher Phoenix Workflow Services (erl,
conopsd, xmpp_cluster) use a configuration
variable
located in the configuration file called
“config.ini” that is located in the folder:
%programdata%\Konica Minolta\blox
The variable is:
[blox]
data = %ALLUSERSPROFILE%\\Konica Minolta\\conopsd\\var
Setting data to another location and then
restarting
the Workflow Services using the Workflow
Services
Manager will reset the location where most, but
not
all, temporary files are written.
Note: Data should never be set to a network
share
or non-permanent location (e.g. USB drive).
You
should only use a local drive other than the
Windows System Drive (i.e. Drive D:).
The new folder location must previously exist
before
changing the config.ini file and restarting the
services.
Set the folder permissions to “everyone” and
“full
control” to make sure the folder structure can
be
accessed. Failure to do so will result in
“Access
Denied” errors in the workflow log and the
workflow
will fail. If the user does not want to set
“everyone” as access then as an alternate set
the
user ID .\conopsd and the User profile the user
uses
to log on to windows to create the Dispatcher
Phoenix workflows with “full control”
permission.